Pages

Thursday, July 29, 2010

Fruit Salsas

I have a secret to share.  One that makes me a freak apparently, but at some point we all have to come out of our little closets. 

Summer is my least favorite season. Seriously. Let the stone casting begin.

It's not that I don't appreciate aspects of summer, but there are three other seasons with so much more to offer.  Oh Spring and Fall...there is nothing like the first flowers of spring, the cool spring rain and opening your bedroom window at night to let the spring breeze in while you sleep.  And fall?  The crunch of leaves, the pumpkin patch, the colors, and bringing out the blankets to snuggle down under..it just can't be beat.  Winter--I don't get why people hate it so.  I love snowy days and white winterlands and roaring fires. I love being toasty oasty inside baking bread while the wind whistles outside and the snow falls.  And never forget that Christmas lights only come out in winter. But summer?  Sure there are early morning markets and evening outdoor concerts.  That's good stuff.  But anything in the middle of the day? What's so great about being life suckingly miserably hot?

But alas, produce is indeed one of summer's saving grace.  Berries and cherries and veggies, oh my. And why limit it to just snacking, brekkie and sweets?  Fruit salsas are perfect with dinner.

This first cherry salsa is courtesy of the Whole Foods iPhone App.  That app is just genius...you type in an ingredient (or ingredients) and it returns a gazillion different options. 


Cherry Salsa with Balsamic Vinegar and Basil
Makes about 1 1/2 cups

Ingredients
2 cups sweet cherries, pitted and roughly chopped
1 jalapeño, stemmed, seeded and finely chopped (I used a Thai chili isntead)
1 shallot, finely chopped
1/4 cup basil leaves, chopped
2 teaspoons balsamic vinegar
Salt and pepper to taste

Directions
Toss all ingredients together in a large bowl then cover and chill for at least 1 hour before serving.  Serve over grilled salmon, chicken or pork.

Obviously, I choose salmon.  Almost always.


Not a fan of cherries?  What's wrong with you?  And how about blueberries instead?  Martha Stewart Living had a fantastic recipe for for blueberry basil salsa which I made last summer and served with cream cheese and crackers.  This time I served it over grilled mahi mahi instead per her original suggestion.  Well, technically, her suggestion was over grilled chicken but fish was just as fabulous.  Maybe summer isn't so bad after all...


Blueberry Basil Salsa
Adapted from Martha Stewart Living

1-2 jalapeno chiles
3 cups blueberries, rinsed
1/4 cup finely minced red onion
3 tablespoons freshly squeezed lime juice
1/2 teaspoon salt
1/2 cup loosely packed basil leaves, very thinly sliced, plus whole leaves for garnish
1/2 cup loosely packed cilantro leaves, roughly chopped, plus whole leaves for garnish

Directions
Grill jalapenos until slightly charred and blistered, turning frequently, about 15 minutes. Using a paper towel, pull off stems and remove skins from chiles. Roughly chop flesh and seeds; set aside.
Place 2 cups blueberries in a food processor; pulse until coarsely chopped, about five times. Transfer to a medium bowl, and add onion, jalapenos, lime juice, and 1/4 teaspoon salt; stir to combine. Add basil, cilantro, remaining cup blueberries, and oil; stir to combine.

Monday, July 26, 2010

If You Like to Talk to Tomatoes


Oh how can she possibly be three?!  But three she is and this year, it's all about cucumbers and tomatoes.  Bob the Tomato and Larry the Cucumber to be exact.  Veggie Tales all the time.  You know it's bad when you walk around work singing the Veggie Tales theme song, and your dad walks around singing  "Oh where is my hairbrush?"

I did learn a bit of a lesson last year after the  SpongeBob cupcakes-there was not a chance I was making individual cupcakes this year.  Even if you are my favorite three year old in the entire world.   As it turns out, as long as the characters are recognizable, three year olds could care less about whether they are cupcakes or big cakes.

The marshmallow fondant recipe was the same as last year's(recipe in the above link)--just toxic green and red this time around. 


This year I made my brother help.  What's the point in having so much artistic talent in the family if you can't put them to work right?  I think she liked watching daddy decorate her birthday cake--and she definitely liked the final product...


Happy, happy birthday Peanut!!! 


Tuesday, July 13, 2010

Sweet Potato Pasta

I know I've already raved about the sweet potato pasta and sage brown butter combination before. Sage and squash or sweet potatoes is so perfect though it deserves some experimenting. I think I've made a plain pasta with a sweet potato filling and I've made a sweet potato pasta.  And never have I tried semolina flour before.  Having semolina flour, a sweet potato and fresh sage from my mom's garden was like culinary destiny screaming to be fulfilled.

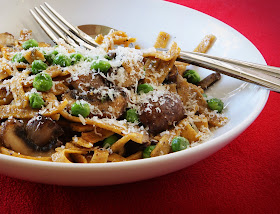
I'm not going to lie to you.  The ravioli was a lot of work.  A lot, a lot.  But it was worth it. There's nothing like the oozy filling seeping out of a filled pasta.  Using the remainder of the dough to make linguine?  Eh.  I felt wasteful tossing the two remaining sections of dough so made up some linguine and stored it in the fridge. I cooked it up a few nights later with some garlic, olive oil, mushrooms and peas.  It wasn't filled, it wasn't magical.   That's a lot of work for just eh.  Especially when you can pick up fabulous sweet potato pasta at the farmer's market.  That only takes 30 seconds tops. 


Whole Wheat Sweet Potato Pasta

2 sweet potatoes
2 tsp dried sage
1/2 teaspoon salt
1/2 teaspoon ground nutmeg
1 egg
1 cups whole wheat flour
1.5 cup semolina flour

2 Tbsp butter
8-10 large fresh sage leaves

For Ravioli
1 cup ricotta (or mozarella cut into small pieces)
Remainder of sweet potato puree

Microwave sweet potatoes until tender.  Once the potatoes are cool enough to work with, remove the peels, and pulse in food processor with 2 tsp dried sage. 
Pour flours onto countertop blend in the salt and nutmeg.
Make well in center and add egg. Mix in the flour a little at a time along with 1/2 cup sweet potato puree. Use more or less flour as needed to make soft dough.
Let dough rest for 10 minutes.


To make Ravioli:
Cut pasta dough into 6ths and process each section through pasta machine--flattening to 4th or 5th setting.  You want a relatively thin dough since you will be pressing two layers together.
Lay one section of flattened pasta dough onto counter and fill leaving spaces enough to seal and cut each ravioli.  I used a sqaure of mozarella and some of the sweet potato puree.  Ricotta is more traditional but I was not up for running to the store.
Brush egg mixture around filling and top with another piece of dough.  Press firmly around the filling to completely seal.  Use rolling cutter to cut into squares. 

Brown butter on medium-high heat until it starts to brown. Toss in sage leaves and remove from heat.
Boil large pot of potted water. Cook ravioli for 3-5 minutes
Serve ravioli drizzled with brown butter and topped with freshly grated parmesan

Monday, July 12, 2010

Cookbook #67, A Passion For Baking


Marcy Goldman shares her passion for baking in her appropriately titled cookbook "A Passion for Baking".   The cookbook starts with a section on baking secrets, and continues with  baking hints and tips throughout the book.  And the recipes?  Well how many baking cookbooks are filled with recipes that have you throwing up your hands and screaming "never!!!"  None.  Exactly.  And this cookbook is no different.  It's full of all of those tempting baked goodies that have you turning the pages and wondering how you will ever choose that first recipe to try. 

Tea and scones--such a happy time.  My first experience with tea time came when I'd first moved to NY and working for a Brit.  He was a super tall, strapping gent and took his tea daily at the same time. Up to that point, I always thought tea was Liptons, but the cup he brewed me--that'd put hair on even a girly girl's chest. He said it was Scottish Breakfast Tea and I fell in love.  Deep, dark, strong amber colored tea with just the right amount of cream--nothing like it. To this day I instantly judge a tea by the color that begins to swirl around that first drizzle of cream into the cup.  Yes, I pour the tea before the cream--I'm not Britsh y'all.

A tea that dark needs a strong scone to stand up to it. I have a favorite scone recipe--a bit crunchy on the outside, soft on the inside but solid enough to hold a big glob of clotted cream.  When I saw this recipe for scones I almost kept going...but then the honey butter glaze was a bit intringuing.  And cream and butter?  This would be toxic but you have to try right?

My biggest aversion to these types of recipes is the mess.  Goo on the hands.  Flour everywhere.  This is the exact reason I am not a true baker at heart.


The outcome?  I don't think it was the cookbook but the recipe was not my favorite.  It was good but it was just almost cakelike. And true to promise, it did stay moist for days--how could it not with the vast amount of fat inside of it?  I couldn't bring myself to put clotted cream on the top when there was so much cream and butter on the inside.  I'd rather have the clotted cream on top.  But all in all, that's not a commentary on the cookbook, but rather a commentary on a girl and her devotion to the type of scone that was the perfect compliment to the perfect cup of tea.

Blueberry-Raspberry Honey Butter-Glazed Scones
From A Passion For Baking

1 tbsp fresh lemon juice
1 cup, approximately, whipping cream
3 1/2 cups all-purpose flour
1/2 cup sugar
1/2 tsp salt
4 tsp baking powder
1/2 tsp baking soda
3/4 cup unsalted butter, cut into chunks
1 large egg
2 tsp pure vanilla extract
1/2 - 3/4 cup frozen blueberries
1/2 - 3/4 cup frozen blackberries
Milk or melted butter for brushing
1/3 cup honey
1/4 cup unsalted butter
Put lemon juice in a 1 cup measuring cup, pour in whipping cream to 1-cup mark, and let stand a few minutes to make soured cream.
Preheat oven to 425 F. Line baking sheet with parchment paper.
1. In a food processor, add flour, sugar, salt, baking powder, and baking soda and blend briefly. Add butter and pulse to make a coarse, grainy mixture.** Turn mixture into a large bowl and make a well in center. Add egg, vanilla, and enough soured cream to make a soft but firm dough. Gently fold in berries.***
2. Knead briefly on a lightly floured work surface, adding more flour, if required, to make a firm dough. Pat out to 1-inch thickness. Cut into wedges or rounds and place on prepared baking sheets. Brush each scone with milk or melted butter.
3. Bake until scones are nicely browned, about 16-19 minutes.
4. Meanwhile, for glaze, heat honey and butter in a liquid measuring cup in a microwave until mixture is just simmering, about 1 1/2 minutes on high, stirring after 45 seconds.
5. Brush scones lightly with honey-butter glaze as they come out of the oven. Let stand on baking sheet. Repeat with more honey-butter glaze, more generously, about 15 minutes later.
Makes 8-12 scones

Friday, July 9, 2010

Always A Tart


A fruit tart is the perfect way to take advantage of super fresh, straight from the bush, raspberries and blueberries. To me, the essential foundation is a crumbly shortbread crust. I still recall the great disappointment I felt when I once chose a flaky pie type tart shell recipe. It’s just not my preference for a fresh fruit tart where the topping flavors are simple and clean and the buttery cookie-like shell is such a huge part of the overall dessert.


Luckily, Dorie Greenspan’s recipe for a Sweet Tart Dough (pâte sablée) is that perfect shell. I used to experiment with different shell recipes but really, you shouldn’t mess with perfection when you’ve found it. Save the experimenting for the toppings… custards and cream cheese fillings, with strawberries, blueberries, raspberries or kiwi. The possibilities are endless. Keep an unbaked shell in the freezer and you can have a dessert ready to go with just a bit of fresh fruit from the market. Easy peasy.


Sweet Tart Dough
From Dorie Greenspan Baking: From My Home to Yours


1 ½ cups flour
½ cup powdered sugar
Pinch of salt
1 stick plus one tablespoon frozen butter cut into small pieces
1 large egg yolk

Place flour, sugar and salt in a food processor and pulse a couple of times to combine. Scatter butter over dry ingredients and pulse until butter is coarsely cut in—you should have some pieces the size of oatmeal and some the size of peas. Stir the yolk to break up and add a little at a time, pulsing after each addition. When all egg is added, pulse in long bursts of about 10 seconds each until dough comes together roughly. Dump onto board and knead lightly and sparingly to incorporate any remaining dry ingredients.

Butter a 9 inch tart pan with removable bottom. Press the dough evenly over the bottom and up the sides of the pan. Freeze for 30 minutes or longer before baking.

Preheat oven to 375 degrees. Butter the shiny side of aluminum foil and fit the foil buttered side down tightly against the crust(no weights needed). Put the tart on baking sheet and bake for 25 minutes. Carefully remove foil and press down any puffed areas with back of spoon. Bake for additional 8-10 min until golden. Cool to room temp before filling.

Greek Yogurt Filling
1 cup greek yogurt
½ a block of cream cheese softened
3-5 tbsp honey(to taste)
1 tsp vanilla

Combine filling ingredients adjusting honey to personal sweetness preference. Top tart with filling and fruit of choice. Refrigerate for two hours to allow cream cheese to set.

Tuesday, July 6, 2010

Granny Means Granny


A update request on my progress on the Granny Square blanket reminded me that it existed...I seem to forget these things.  So out it came for a brief bout of progress.  At this point my my brother pointed out that it "looks like something grandma would have."  Yes--duh.  That is indeed why it is aptly named Granny Squares.  Or hexagons in this case.

This process is a bit out of control.  I've been connecting them as I go along--connecting it takes just as long as crocheting the base.  9.5 minutes per circle and another 10 minutes to connect them.  I timed it many times because I could.  Luckily, I had some assistance this time...


I'm using a pattern I found on Ravelry--but it links out to this blog post.  It takes just a few hexagons to learn the pattern and then it's completely brainless from there.  Except for the joining of course, which involves acrobatic feats of headstands and blanket twisting.  Ambidexterity is helpful as well.  But all of that is still better than crocheting all of the hexagons and then sewing them together.  If I crocheted 200+ hexagons separately, all I would ever have are 200+ hexagons.  Which isn't so bad for Peanut who found them to make delightful tea cakes and schmancy necklaces.