Showing posts with label Cooking-Italian. Show all posts

Wednesday, August 27, 2014

Cooking at a Fattoria


I've received a few e-mails asking where the food posts are.  Too be honest, food hasn't really been as big of a thing as one might think.  Aside from the addiction ritual of stopping in for 2-3 caffe macchiatos every day, food is a spur of the moment decision to be made only when actual hunger pains strike.  

First of course,  there's the daily shopping and storage issue.  The second half of that is that a lot of recipes require a full pantry of ingredients I am not interested in purchasing and then purging.  Eating out and takeout has been the norm and many other meals have consisted of picking up fresh pasta and a bit of sauce (at a small mom and pop shop that sells nothing else) to throw together at the house, grabbing a panini or pizza on the go, or more frequently, eating caprese salads.  I am the queen of caprese salads and most likely,  have eaten my weight in tomatoes already.  

When in Italy though, one must learn to make pasta right?  It's on my list of goals.  I've made pasta at home, but I really needed an Italian to show and guide me through the steps, the texture of the dough and the right steps for rolling it out--just in case Food Network is lying. 

I'm studying italian at Lucca Italian School and they have optional activities 3-4 times a week after classes.  This week's cooking demo was at a vineyard, Fattoria Sardi Giustiniani, just a bit outside of the city center.  We spent the afternoon touring, cooking and eating our wholly Tuscan meal.  


The only people more lucky than the owners of a Fattoria are those two rockstars living on a cliff above the waters in Cinque Terre.  


On the menu: Eggplant stacks, vegetable lasagna, chicken cacciatore and biscotti made with vin santo. 

Really, it starts out all about the wine.


Our  teacher Eva walked us through the essentials of making pasta...apparently it's about using two types of flour: all purpose and semolina.

On a side note, Eva spoke only Italian.  We had a translator there but I understood quite a bit of what she was saying. It helps that Italians use a lot of motions with their words.


I've always been pretty afraid of adding too much flour or working the dough too much--turns out pasta dough is pretty tough stuff.  


The kitchen smells were unbelievable.  Instead of browning the chicken in straight olive oil, we browned it in hot oil that had huge handfuls of rosemary, sage and garlic in it.  Why have I never thought of this genius technique?


The chicken was seriously crazy delicious. Since the recipes were from a class, I won't share them but definitely looking forward to mixing this one up when I get home. 


Quite the life to spend the days lazing about on an empty wine barrel in the warm Italian sun. 


The light was perfect and beautiful at sunset but so fleeting as light usually is.  By the time I wiped all of those fingerprints off the glass, I'd lost the sunbeam.  :(  I'll have to drink more wine and keep trying. 


Sunday, September 29, 2013

Spicy Chicken Pasta


Sometimes it's just about saying that you could and you did.  I borrowed my mom's pasta maker just to see if homemade pasta would be one of those life changing experiences like the homemade tortillas were.  

These little guys were definitely a lot of work.  A lot, a lot, a lot.  Some things that are labor intensive are worth it in the end...like chocolate babka.  Seriously, the first time I made that and then tasted it, I swore I'd make it every single weekend, despite the effort that went into the bazillion turn, roll, fold, refrigerate steps it took to get that awesome flaky bread.   And homemade ravioli and sheet pasta is definitely worth the extra effort on occasion. 

So how about homemade ziti/rigati pasta?  It sure looks like it's something pretty special as it comes cranking out.


After its cooked it looks like it's exponentially better than dried pasta--kind of like the fat chewy yumminess of homemade noodles in chicken noodle soup.  


I figured pasta this substantial needed a bit of bite in the sauce so I opted for a super spicy red tomato based sauce for these little fat pasta guys. 


And the result....drum roll please...........  eh.   After all that work, this was really like any other pasta dish.  It was yummy and I loved the spiciness, but when something takes that much work, it should jump off the plate and into your mouth.  A little dance on your tongue would be nice as well.  Worse than the work of making the pasta though was cleaning that machine and scrubbing the gooey covered molding plates with a mini brush.  Yuck. 

There is however, a little satisfaction in knowing you've tried something and can cross it off your to-do list.  I've shared the recipe below minus the homemade pasta part.  I'd recommend you skip the homemade noodles and whip up some chocolate babka with the time you save. 


SPICY CHICKEN PASTA

4 tbsp extra virgin olive oil
1 lb chicken breast sliced
2 cloves minced garlic
2 tbsp red pepper flakes (adjust to your taste)
1/2 tsp sea salt
1/2 tsp freshly ground black pepper
1 1/2 cup favorite marinara sauce (my fav recipe coming soon)
1 cup peas 
3 cups hot freshly cooked pasta
freshly grated parmesan

  1. In a large sauté pan, heat 2 tsp olive oil over med high and cook chicken just until done. 
  2. Remove chicken from pan and turn heat down to med.  Add remaining 2 tsp olive oil to pan along with garlic and 1 tbsp red peppers.  Stir and cook for 1-2 minutes
  3. Add chicken back to pan and stir to coat with garlic and peppers.  Add salt and pepper.
  4. Stir in pasta, peas, marinara and extra red pepper flakes and cook 3-4 minutes or until all ingredients come to temp.  Serve with freshly grated parmesan. 

Monday, June 24, 2013

Wonton Lasagna by the Campfire


Who says camping food has to be hot dogs on a stick?  After a long day in the high country sun, there's nothing like a nice helping of hearty lasagna to stave off the chill of cool Rocky Mountain nights.  And while lasagna may sound like a lot of work, a little prep at home and some wonton wrappers make it ultra campfire friendly. 

Yes, wonton wrappers.  They're fantastic.

This recipe is as easy as mixing the ricotta and eggs at home, packing in a ziploc baggie and then bringing the wonton wrappers, ricotta mixture, pasta sauce, garlic, cheese and 1 lb of ground chickie (or ground beef) to the campsite. 

You start off by browning the chicken in a heavy cast iron over the fire--add 2 cloves of minced garlic.  If using ground beef, drain off the fat.  Add the pasta sauce and mix well.


Remove 2/3 of the meat and sauce mixture.  Spread remaining meat mixture evenly across bottom of pan and then layer wonton wrappers over the top of the meat mixture.  


Top with 1/2 of the remaining meat mixture.  Snip corner of ricotta and squeeze half of the ricotta over the pasta sauce and meat.  Try and do it so it doesn't look this unfortunate and questionable.  No worries though, it still tastes fantastic.

Spread evenly and then top with shredded cheese.  Add one more layer of wontons and repeat above steps. 


Make sure the top layer has a nice cheesy layer. 


This recipe works super duper well in a cast iron dutch oven with feet because you keep the pot off of direct flames and heap coals on top.  I used a skillet so had to keep the flames really low.  Cover with lid or foil and let cook through, about 30 minutes.  


Let sit for 10 minutes before serving and enjoy.  


I have not quite figured out my personal need for a macro lens.  This is a very cute Boston puppy eye  nonetheless.  Yes, I promise l'll work on the macro photography skills.


Campfire Lasagna

Ingredients
1 1.5 cups ricotta
1 egg
2 tbsp italian seasonings
1/2 cup shredded parmesan
3-4 cups tomato pasta sauce
1 pkg wonton wrappers
1 lb ground chicken
2 garlic cloves, minced
1 bag shredded italian cheese blend 

Directions
  1. Before leaving home prepare ricotta mixture by stirring together ricotta, egg, italian seasoning and 1/2 cup parmesan.  Store mixture in Ziploc baggie. 
  2. At camp site, brown ground chicken in a well seasoned cast iron skillet or dutch oven
  3. add minced garlic and cook 1-2 minutes until fragrant
  4. Add tomato sauce and stir well
  5. Remove 2/3 of meat/tomato sauce mixure
  6. Spread remaining meat mixture evenly over bottom of pan
  7. Layer wonton wrappers over top, overlapping slightly
  8. Top with 1/3 of the meat sauce, half of the ricotta and half italian cheese mixture
  9. Repeat step
  10. Cover with foil or lid and cook 30-40 minutes until heated through and wonton wrappers are cooked
  11. Let sit 10 mins and serve


Wednesday, January 2, 2013

Mushroom Ravioli with White Wine Sauce


I've been on a pasta kick recently.  Since I'm not the world's biggest pasta fan to begin with, I'll admit I'm on a pasta making kick.  The eating part is just what you do with it all after you make all of the ridiculous amounts of pasta. 

If you don't like mushrooms, avert your eyes here, and probably for the remainder of the post.  There are lots and lots of mushrooms here.  Love those little suckers. 


I have this handy dandy ravioli maker that makes quick work of ravioli.  If you don't have one, you can of course lay the pasta sheet out, fill with filling and cut around the dough in that traditional ravioli making way.  If Laura Ingalls Wilder had been Italian and ridden in a covered wagon across Umbria, she'd have made it that way. 


I like that the filling fits so nicely in the little hollows of pasta and that a rolling pin crimps and seals these little guys in no time.  It does stick a bit though so flour the ravioli maker liberally before placing the first sheet of pasta down. 


This recipe makes enough for three dozen ravioli and freeze perfectly if you don't happen to need three dozen ravioli.  Just separate the ravioli on a baking sheet, place sheet in freeze and freeze for 2-3 hours. After the ravioli are frozen, you can throw them together in a freezer bag.  


The white wine sauce perfectly compliments the mushroom filling.  If you don't like to mix your whites and reds you can use white wine in the filling.  I used red because it was hearty enough to be match the earthy boldness of the shrooms, but white wine would work as well. 

The white wine sauce may separate a bit at first, but whisk, whisk, whisk and it'll all come together into a delicious cheesy deliciousness. 


Mushroom Ravioli with White Wine Sauce

Pasta Ingredients
2 cups bread flour
1 tsp salt
3 eggs
1 tbsp olive oil

Ravioli Filling 
1 tbsp olive oil
1 lb baby bella mushrooms finely diced
1/2 tsp salt
1 garlic clove finely minced
1/2 cup dry wine
1/2 cup ricotta
1/4 cup grated parmesan
1/2 tsp finely ground black pepper

White Wine Sauce 
1 tbsp unsalted butter
1/2 tsp salt
1 tbsp flour
1.5 cups dry white wine
1/2 cup parmesan
  1. Add all pasta ingredients to Kitchenaid mixer with dough hook attachment. Turn power to 2 and mix for 6-7 minutes or until dough is smooth and indent pressed into dough bounces back. Cover and let rest 30 minutes.
  2. While dough is resting prepare the mushroom filling. 
  3.  Heat olive oil in large saucepan over medium-high heat.  Add garlic and cook for 1 minute.
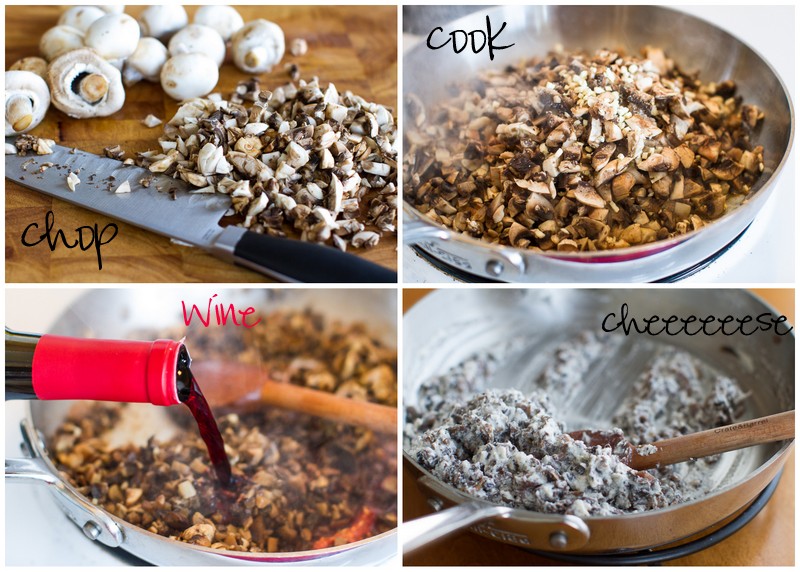
  4. Add mushrooms and salt and sauté for 3 minutes.  Add wine and cook until most of the wine has evaporated, about 5-7 minutes. 
  5. Remove from heat and stir in ricotta, parmesan and black pepper. 
  6. Cut the rested dough into two equal halves. Cut each half into equal thirds to give you 6 equal sized pieces. Keep all dough covered that you are not working with.
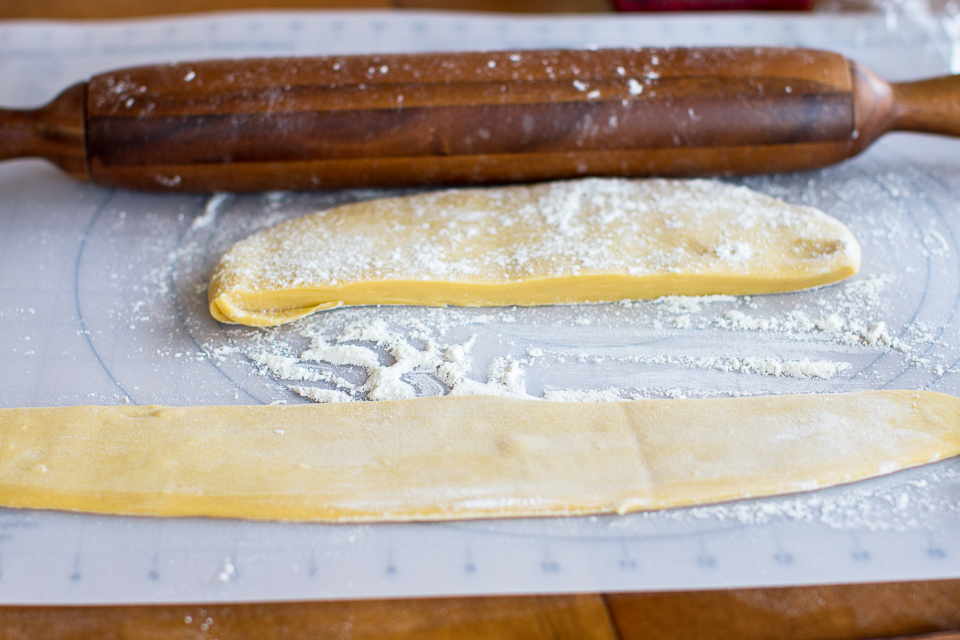
  7. Flatten each dough section into a long oval. Pass through the pasta roller at the widest setting. Close the pasta roller one notch and pass through again. Close the pasta roller again pass the pasta through again. Add flour to the pasta with each each pass through the pasta roller. Continue to do this until the pasta is thin. I used the manual roller setting 8.
  8. Lay one layer of dough down on working surface or ravioli maker if using one.  Add 1 rounded tsp filling to each.  Lay another sheet over top and press firmly around all ravioli pieces.  Cut apart.  If using ravioli maker, lay second sheet on top and use a rolling pin to roll seal and crimp edges. 
  9. Place a large pot of salted water on to boil before you prepare the sauce.
  10. To prepare sauce, melt butter in small saucepan over medium heat.
  11. Add flour and salt and cook for 2 minutes stirring throughout
  12. Whisk in white wine and continue whisking until sauce begins to thicken, about 4-5 minutes.  Remove from heat and add parmesan and whisk well until all cheese is melted
  13. Cook ravioli in salted water for about 4 minutes or until they begin to float.  
  14. Remove ravioli from water and serve topped with white wine sauce. 

Thursday, December 13, 2012

Chicken, Spinach and Quinoa Lasagna


I like that I can hide behind my blog and you have no idea what a fruitcake I am at times. Hyperbole?  Love it.  Absolutely and obviously ridiculous thoughts and comments? Yep, those too. The very smell of rubbing alcohol and overall aroma of a medical office ?  Forget about it.  I sit there looking as calm as can be all the while fighting inclinations to run screaming out of the room in a full panic.   I almost told the  nurse after my first shot that I was pretty sure I could actually feel all of the toxins spreading through my system and killing me.   But alas, I sat quietly for the entire round of shots because while I'm half mental freakazoid, I'm also half awesome.  

Yep, I am fully immunized for an upcoming trip to Cambodia and Thailand with one of my very favorite organizations --LightBridge International.    This trip opportunity came up quickly and it feels like a bit of a scramble to get everything ready and in place in such a short time.  We'll be heading to Minefield Village in Cambodia first to spend time with families living in areas once filled with land mines  from the Khmer Rouge regime.  We are then heading over to the Burmese Refuge Camp on the Thai-Burmese border and after that, visiting with the kids (and my sponsor boys) in Chiang Mai.  It's a crazy packed two weeks and I feel so blessed to have such a wonderful opportunity. 

I do not feel so blessed to have been stuck multiple times with killer bacteria today.  

Brooklyn says "suck it down drama queen--I get them every year".


Lasagna is great comfort food after an afternoon spent as a pincushion.   I can't actually remember the last time I made lasagna. Shocking right?  Lasagna is really one of those foods that should be made often. 

I've had some success and a lot more failures when it comes to making homemade pasta but I am determined to master it.  I read an article that the extra gluten in bread flour helps the pasta stick together better and after trying bread flour, I'm a convert. The pasta made with bread flour holds together nicely while running through the pasta roller. 


And of course the quinoa--it's pretty phenomenal in lasagna.  With the quinoa, you can get away with fewer layers of lasagna noodles and the quinoa makes a nice hearty lasagna.

Lasagna is a little bit of work to throw together but you can make a couple at the same time and freeze the extras (unbaked) in the freezer for a little lasagna love anytime you feel like it. 


Chicken, Spinach and Quinoa Lasagna

Pasta Ingredients
2 cups bread flour
1 tsp salt
3 eggs
1 tbsp olive oil

1 10 oz frozen package spinach, thawed and squeezed to remove excess water
3 cups ricotta
2 eggs
1 cup cooked quinoa
1 tsp salt
1 tsp pepper
1 tsp dried basil
1 tsp garlic powder
1 cup grated parmesan
8 oz mozzarella (sliced or shredded)
1 lb ground chicken
2 tsp minced garlic
1 tbsp olive oil
24 oz  favorite tomato pasta sauce
1/4 cup balsamic vinegar
1/2 cup red wine

Directions:
  1. Add all pasta ingredients to Kitchenaid mixer with dough hook attachment.  Turn power to 2 and mix for 6-7 minutes or until dough is smooth and indent pressed into dough bounces back.  Cover and let rest 30 minutes.
  2. While dough is resting prepare the chicken ragu.  Heat olive oil in large saucepan over medium.  Add chicken and garlic and cook through. Add tomato sauce, balsamic vinegar and red wine to the chicken and simmer over medium low heat while pasta dough is resting. 
  3. Flour a working mat and place dough on mat.  Sprinkle flour on top and roll out to 1/4 inch thickness.  Switch to pasta roller and roll dough through until desired thickness.  I used # 8 for my final thickness.
  4. Add ricotta, spinach, eggs, quinoa, salt, pepper, basil, garlic powder and parmesan to large bowl and mix thoroughly. 
  5. Preheat oven to 375 degrees. 
  6. Spread a thin layer of tomato sauce in a baking dish in an even layer(will make enough for 9x13--I split into two smaller pans). 
  7. Cut lasagna noodles to correct size and layer over sauce.  Spread spinach quinoa mixture evenly over noodles, cover with another layer of ragu and a layer of mozzarella.  Repeat 1-2 more times ending with a  topping of mozzarella. 
  8. Bake for 30 minutes.  Let rest for 5 minutes before cutting. 

Monday, April 9, 2012

Fettuccini Alfredo with Zucchini Ribbons and Comfort Food by Ellie Krieger


I've never had an alfredo sauce that didn't come from a jar.  Even as a type that I almost don't even believe it myself.  My mom didn't make a lot of pasta as we were growing up and when I go to an Italian restaurant I order eggplant parm or chicken piccata.

When I received Ellie Krieger's new cookbook Comfort Food Fix, (Cookbook #81) I was immediately drawn to this recipe that included a healthier alfredo sauce and tons of zucchini ribbon "pasta." I love Ellie and her healthy twists on food.  My absolute favorite thing about Ellie's cookbooks is that she is not about substituting low fat, artificial foods and sweeteners to just to lighten the calories in foods.  She uses real ingredients and sugars and fats but in moderation and includes healthy additions to improve the nutritional value.   Comfort Foods is full of those recipes that we love such as quiches, french toast, coffee cakes, quick breads, burgers, cobblers, cookies and casseroles, but with a cleaner, healthier twist.

Chicken Alfredo Pasta.  Yep, not necessarily known for being light and healthy.  But with substituting whole wheat pasta for regular, replacing some of the pasta for veggies and creating a sauce with evaporated milk, I think she was pretty successful in creating a recipe that is ultra creamy, cheesy and rich.  Almost a little too rich tasting.  I am though, the girl who's never had real alfredo sauce to compare this to.  

Love the zucchini ribbons twist.  I would easily make this again with just the zucchini and omitting the pasta all together.  The garlic cooked zucchini was that delish.


As the cookbook mentions, save some of the pasta water to loosen the sauce a bit.  Mine was pretty thick so I used all of the pasta water.  It made a super saucy pasta because I dumped the zucchini and the pasta into the sauce rather than vice versa.  Next time I'd definitely conservatively spoon the sauce over the zucchini and pasta.  In the end though, the sauce all soaked into the noodles as sauces usually do. 


Ellie's recipe had instructions for pan cooking some chicken, but since my grill came to live at my place, I always have chicken marinating in the fridge to throw on the grill. This was pretty fantastic with some juicy grilled marinated chicken thrown on top.  


Fettuccini Alfredo with Zucchini Ribbons
adapted from Comfort Foods by Ellie Krieger

Ingredients
  • 2 tablespoons olive oil
  • 2 cloves garlic, minced
  • 2 medium zucchini
  • 8 oz ounces whole wheat fettuccini 
  • 2 tsp flour
  • 2/3 cup cold 1% milk
  • 5 oz can evaporated skim (not condensed milk)
  • 1/2 teaspoon salt, plus more to taste
  • freshly ground black pepper
  • 2/3 cup freshly grated Parmesan cheese

Directions

  1. Using a vegetable peeler, carefully create long strips of zucchini. If pieces are too wide, use a knife to cut into fettuccine width pieces 
  2. Heat 1 tablespoon of the oil in large non-stick skillet over a medium heat. Add 1 clove of the garlic and cook for 30 seconds. Add the zucchini ribbons, cover and cook until the zucchini is tender, stirring occasionally, about 5 minutes. 
  3. Cook the pasta al dente according to the directions on the package. Ladle out a half cup of the pasta water and set aside. Drain the pasta. 
  4. For the sauce, stir the flour into the low-fat milk until it is completely dissolved. 
  5. Put the remaining tablespoon of olive oil in the skillet and heat over a medium-high heat. Add the remaining clove of garlic and cook for 30 seconds. 
  6. Add the flour-milk mixture and cook until the mixture begins to boil, stirring constantly. Reduce heat to low and cook, stirring, for 2 minutes more. 
  7. Add the evaporated milk, salt and the cheese and cook, stirring, until the cheese is melted, about 1 minute. 
  8. Season with salt and pepper to taste. 
  9. Add the the zucchini and pasta in the pot and toss to combine. Add a little of the reserved pasta water as necessary to loosen the sauce to a light and creamy consistency