Showing posts with label Bread. Show all posts

Sunday, June 29, 2014

Cinnamon Soft Pretzels and Oh, Some Life Changes.


I know, it's been forever.   It's a good thing my livelihood doesn't depend on writing new posts and updating my blog.  There hasn't been tons going on in the kitchen because there's been a lot of this going on....


I really hate packing.  This hasn't been the everyday run-of-the-mill packing either, this time around it's involved selling furniture, booking storage and donating as much as possible--all still part of the "simplify" new years resolution.     And oh yeah, I gave notice last month and bought a one way ticket to Italy.


At the end of July, I'm heading to NY for a week and then it's off to Italy to study some Italian language and history and get a refresher on Renaissance art history. The former Liberal Arts major in me sings "hallelujah."  I'm signed up for a couple of months of intensive total immersion Italian lessons but the biggest plan is to not have any plans--you know, just live a little dolce vita for a bit.  Tranquilo. 

I bought a one-way ticket but I know I have to come back.  The biggest deterrent to this whole adventure was not the part where I quit a stable job that paid the mortgage, but rather thinking about leaving this one....


Finding an acceptable option for Brooklyn was really tough.  Really, really ridiculously tough.  I considered taking her because even with a full ticket, it was cheaper than boarding but smush face dogs aren't very welcome by the airlines.   I talked to quite a few people and long term boarding facilities before finally finding some great people to care for her.  I knew I'd stay home before I'd let her be kenneled for long periods of time each day so it had to be an in-home option with someone who likes loves dogs,  iand very importantly, someone who would definitely give me my dog back when I came back.  You'd think that would be a given but I swear I talked to a woman who was a self-declared "BT Addict" and got the sense I'd never see Brooklyn again if I went with her.   Just like everything else in the planning of this trip, it all eventually worked out.   I do feel so guilty though and already miss this peanut if that's possible.  

So between finding boarding and scheduling everything from movers to cleaners and running a bazillion and one errands, cooking has gone by the wayside.  That is of course except when I come across an abundance of ingredients that I feel guilty about throwing out...like a half-full 25lb bag of flour.  Yikes.  

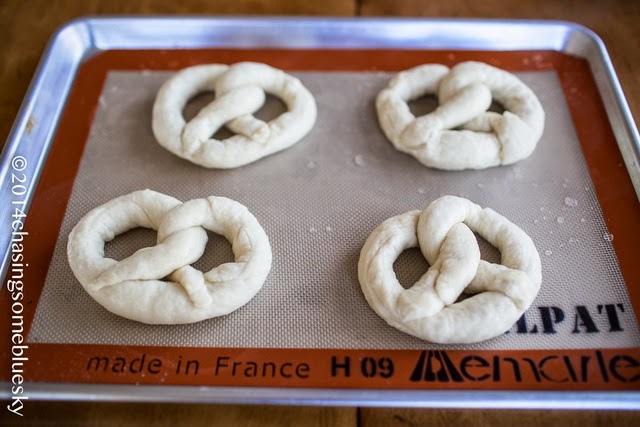
Luckily, pretzels are one of the easiest doughs to make and when covered with cinnamon sugar are seriously one of the best things ever.  This is the same recipe I posted last year for the pretzel dogs(the same recipe that everyone's posted really).  Pretzel dough is just that flexible. 


Rolling this dough into balls makes some pretty awesome pretzel rolls as well. 


Cinnamon Soft Pretzels

Ingredients:

1.5 c warm  water (about 110-115ºF)
1 tbsp sugar
2 teaspoons sea salt
2 1/4 tsp active dry yeast
4.5 c all-purpose flour
4 tbsp melted unsalted butter
12 cups water
2/3 cup baking soda
1 stick of melted butter
1/2 cup sugar 
2 tsp cinnamon
Canola oil for greasing bowl
Directions:
  1. In the bowl of a stand mixer with hook attachment, combine the water, sugar and kosher salt. Sprinkle the yeast on top and allow it to sit for 5 minutes.
  2. Add flour and melted butter to the mixer bowl and mix on low until the ingredients are combined.
  3. Increase the speed to medium and knead until the dough is smooth and pulls away from the side of the bowl, 6-7 minutes.  Remove and roll into ball.
  4. Grease  bowl, add dough and turn, ensuring oil covers all surface of dough.  Cover bowl with towel and let dough rise in bowl until double in size (about 1 hour depending upon temp)
  5. Remove the dough from the bowl. Clean the bowl and then grease it with vegetable oil.
  6. Fill large stockpot halfway with water and bring to a rolling boil. Add baking soda. The boiling baking soda water can make quite a mess--definitely stick with a big pot filled halfway full if you can. 
  7. Preheat oven to 450 and line two sheet trays with parchment paper.
  8. Remove dough and place on work surface.   Divide it into 12 equal pieces. 
  9. Roll out each piece of dough into an 18- to 20-inch rope. Fold each rope in half, twisting the two pieces around one another and pressing the ends together. Twist the bottom end around the top, feeding it through the top hole and pressing to secure. 
  10. Return the twists to the cookie sheet.
  11. One by one, carefully place each twist into the boiling water for 30 seconds. Remove each twist from the water using a large slotted spoon or spatula(s) and return it to the cookie sheet. 
  12. Bake the twists until golden brown in color, 12 to 14 minutes, rotating the pans (between racks and turning to rotate pans) halfway through, then remove the twists from the oven and allow them to cool for 5 minutes before topping.
  13. Mix together 1/2 cup sugar and 2 tsp cinnamon.  
  14. Melt butter and lightly brush the top of each pretzel.  
  15. Hold over sugar bowl and liberally sprinkle cinnamon sugar over the top of each pretzel.  Serve warm.
For pretzel rolls, shape dough into balls and let rise for 30 minutes before adding to boiling baking soda water.  Pretzel rolls will bake for 15-20 minutes depending upon size. 

Wednesday, April 2, 2014

No Knead Potato Bread and a Life Off-Grid

Anyone who knows me knows I love hyperbole.  The more ridiculous I can make something sound, the more I appreciate it.  Like me saying I'm going off-grid.

Off-grid usually means self-sustaining, hunting types who don't have electricity running to their homes...i.e off the power grid.   That sounds pretty cool, but in my case, off-grid means a long weekend in the mtns in a cabin without wifi or TV but full electricity and amenities. It means a car full of groceries I hunted at the grocery store and firewood that someone that is not me chopped.

Bread doesn't fit into the above at all but I'm all about lean efficiency.  One post, two topics.  This second topic is pretty spectacular if you're not on the wheat belly or wheat brain or wheat whatever diet.  

I am not.  I love bread.


And of course, I love no knead bread baked up in the cast iron pan.  This one is yet another variation of the recipe I've posted many times except that the star of this loaf is mashed potatoes.  Bread and mashed potatoes--happy post indeed. 

The core no knead recipe calls for a wet dough and letting it sit overnight.  This one looks a bit wetter than the other doughs, but that's what makes it so perfectly moist on the inside while still maintaing that thick, chewy artisan crust.


I still can't believe that 5 minutes of measuring and stirring results in a loaf like this. 


The potato really just adds moistness so you could even serve this up with jam.  The inside texture and crumb was so fantastic that this version definitely climbs up the ladder of favorites in the no knead category.


No Knead Sourdough Bread

Ingredients
1.5 cup ultra mashed potatoes (no lumps)
3 1/4 cups flour
2 teaspoons sea salt
1 cup water
2.5 tsps yeast

Instructions
  1. Spoon mashed potatoes into a bowl with flour, salt, yeast and water. Mix with wooden spoon until combined. 
  2. Cover bowl with plastic wrap and set aside for 12-16 hours or overnight. 
  3. Heat oven to 450 degrees. When the oven has reached 450 degrees place a cast iron pot with a lid in the oven and heat the pot for 25 minutes. 
  4. While the oven and pan is preheating, dump dough onto a heavily floured surface and shape into a ball. The dough will be sticky--keep flouring your hands and rolling dough in flour while forming ball. Cover with plastic wrap and let rest until pan is ready. 
  5. Remove hot pan from the oven and carefully drop dough into ungreased pan. 
  6. Cover and return to oven for 30 minutes. 
  7. After 30 minutes remove the lid and bake an additional 10-15 minutes or until golden brown. 
  8. Remove bread from oven and place on a cooling rack. Let cool before slicing

Friday, February 14, 2014

Homemade Hawaiian Rolls


I haven't been sulking after Denver's Super Bowl loss.  All that much.  Actually, if you've been a Denver fan long enough to remember the heartbreak of Denver's Super Bowl losses in the late 80s and early 90s, well you've probably learned to effectively cope with the grief.  It's really all about compartmentalizing.   After you get past the initial shock that the team has lost it within the first 12 seconds of the game, you begin to the road to acceptance that it's going to be another one of those.  It get's easier with each blowout.

So homemade Hawaiian rolls.

There are a bazillion recipes out there for Hawaiian rolls--I found this recipe that the blogger said were the fluffiest rolls she'd ever made.  That's just a recipe begging to be made in my book.  Seriously, these are the fluffiest, softest rolls I've ever made as well.  They are not as sweet as the store bought ones but that's a plus in my opinion.  

The sweetness in these comes from brown sugar and pineapple. That's definitely a good start to any recipe. 


I adapted the recipe to use coconut oil instead of olive oil because I am swimming in Costco sized coconut oil over here.  Knowing that there's dough rising on the counter almost ready to bake makes be absolutely giddy.  Is there any kitchen smell that's better? Okay, maybe cinnamon rolls.


When I make rolls I pull the dough around and pinch tightly at the bottom to make a ball shape.  I think I learned once that this forms a tension on the top of the rolls that helps them keep their shape (as opposed to just rolling them like you are rolling cookie dough).  


You can already tell just from the rising that these are going to be super soft and fluffy right?


These rolls are pretty fantastic filled with Hawaiian pulled chicken, but really, they're pretty fantastic straight out of the pan as well.  Try to eat just one. 


Homemade Hawaiian Rolls
adapted from Yammie's Noshery

Ingredients:
1/3 cup milk warm milk
1 packet instant dry yeast
1/3 cup brown sugar
1/4 cup melted coconut oil, plus additional 2 tsp for bowl and pan
4 tbsp butter, melted and slightly cooled
2 large eggs, lightly beaten
3/4 cup pineapple in juice
4 cups bread flour (all-purpose would also work)
1 teaspoon salt
1/2 tsp vanilla

For the tops:
1 egg
1/4 cup water

Directions:
  1. Heat milk in a small saucepan until warm to the touch or about 100-105 degrees.  Add yeast and let rest for 5 minutes. 
  2. Add the oil, butter, pineapple, brown sugar, eggs, vanilla, salt and milk mixture to a mixing bowl and mix on low until combined. 
  3. Add flour and knead for 10 minutes on medium speed and using dough hook. This dough should be  a bit sticky.   
  4. Grease a large bowl with melted 1 tsp of coconut oil.  Add dough and turn to coat dough with oil. Cover with a towel and let rise until doubled (about 45-60 minutes depending upon your kitchen temp). Punch the dough down and divide into twelve equal balls. 
  5. Grease  9x13 inch pan with 1 tsp coconut oil, roll dough into balls and let rise again until doubled (45-60 minutes). 
  6. Preheat oven to 350ºF. Beat together the egg and water for the top and brush the tops of the risen rolls with the egg wash. Bake for about 25 minutes or until the tops are golden browned.

Saturday, October 19, 2013

Pumpkin Pecan No-Knead Bread


I really love bread.  I feel like I need to just come right out and say that because we have another no-knead bread recipe here.  If I really love bread, then I really, really, really love no-knead bread. It's just so easy peasy, your house smells FANTASTIC and you have yummy bread to gorge on.  What's not to love really?  

I embraced the season and made a pumpkin version similar to the Guinness Cherry Pecan bread I made earlier this year.   This pumpkin bread is not remotely similar to a sweet smushy pumpkin quick bread but rather like those big crusty loaves of raisin pecan artisan loaves you find in the bakery.  It's pretty fantastic fresh but even better toasted up with some cinnamony fruit butter.  It's definitely a perfect snack after an early morning walk through fall colors. 

Behold, Pike's Peak.  See it?  That snowy peak way, way, way back there?  I bought a new guide book and saw that a photo of this open space that had phenomenal view of Pikes Peak.  

I checked the book again after the walk....they tricked us by using a telephoto lens.   Still a lovely walk anyway. 


This particular walk was a little experiment to see if Brooklyn could potentially be normal around big dogs.  Since the attack, my formerly angelic and ultra-submissive dog goes into full-on Cujo mode anytime she sees a big dog.   Her behavior is so over-the-top that strangers take to crossing the street rather than passing us on the sidewalk.  The other day a woman with a German Shepherd left the path and crossed a field in order to avoid my crazy snarling dog with her dripping gnashing teeth.  Yeah, I see a few puppy PTSD sessions  in our future.

I was hoping that maybe an easy way to re-introduce her to big dogs would be to meet up with a big dog she already knew.  We went ultra-big in this case...go big or go home right?


Can you find the peek-a-boo Boston in this picture?  Love that face. 


Yeah. Turns out she's just fine with her BFF.  


Being crazy is exhausting.


So the pumpkin bread.  You know a recipe will be A-OK when it starts out like this.  


Same overnight process as the other no-knead breads.  I love how bubbly and yeasty and yummy it looks and smells in the morning.


I baked this in my 4.5 quart cast iron pan and found it required a bit more baking time.  This recipe is slightly bigger than the other ones so recommend using a 5.5 quart pan if you have one.  The recipe below assumes you do...if using a smaller one, you'll want to cook for at least an additional 10-15  minutes covered.  Bread is done when it sounds hollow when you knock on it.  And of course, bread  is delicious when you eat it.  Enjoy!


Pumpkin Pecan No-Knead Bread

1/2 cup chopped pecans
1/2 cup dried cranberries
1 cup water
1 tbsp yeast
1 15-oz can pumpkin puree
1/4 cup sugar
1 tbsp cinnamon
1tsp salt
4 cups flour plus additional for working surface
  1. In a large mixing bowl, stir together pumpkin puree and water until smooth.  Add remaining ingredients except pecans and cranberries and stir well to combine. 
  2. Cover bowl with plastic wrap or plate and set aside for 12-18 hours or overnight. 
  3. Heat oven to 450 degrees. 
  4. Heat pecans in skillet over medium high heat, shaking pan often to prevent burning.   Remove from heat when pecans are lightly toasted.  Set aside. 
  5. When the oven has reached 450 degrees place a 5.5 quart cast iron pot with a lid in the oven and heat the pot for 25 minutes. 
  6. While the oven and pan is preheating, add cranberries and pecans to dough and stir well. 
  7. Dump dough onto a heavily floured surface and shape into a ball. Let rest until pan is ready.
  8. Remove hot pan from the oven and carefully drop dough into ungreased pan. 
  9. Cover and return to oven for 30 minutes. 
  10. After 30 minutes remove the lid and bake an additional 10-15 minutes or until golden brown. 
  11. Remove bread from oven and place on a cooling rack. Let cool before slicing

Saturday, August 31, 2013

Banana Bread French Toast


A holiday weekend deserves french toast don't you think?  After having turned all of the no knead bread from a former post into french toast, I had to look elsewhere in the kitchen for inspiration. 

This is what I found. 


If you are a family, you may not have any leftover banana bread sitting around.  If you are single like me, maybe you will.   I bake a loaf of anything and I have to take it to the office or else it sits and sits and sits.  I have two half loaves of moldy pumpkin bread I just found in the fridge.  

So yes, one loaf of banana bread, fresh and delicious on day one, quickly became 3 day old forgotten banana bread.  


I do like to turn day/s old goodies into french toast.  As I said in my glazed donut french toast post....you're just adding eggs and milk so really making it healthy right?  He-he.


Can you really write a recipe for french toast?  I use 2 eggs, 1 cup of milk, 1 tsp cinnamon and 1 tsp vanilla  whisked together.  Sometimes if I want to mix it up, I use almond extract instead.  Dip the sliced bread, and add to med-high griddle.  Cook until golden and flip--about 3-4 minutes per side.  Top with maple syrup.  Of course.

Happy and safe Labor Day weekend wishes!

Saturday, August 10, 2013

No Knead Cast Iron Sourdough Bread...French Toast


This is a little bit about a french toast recipe, but more about what to do with all of that leftover no-knead cast iron bread you'll probably be making after the weather slowly moves from hot cruel summer to cool cozy fall.   Yes?  Yes. 

Hopefully you've had a chance to make some of the basic no frills no-knead bread..there's nothing like pulling a loaf of freshly made artisan type bread out of the oven, and it's even better if it only took a few minutes to throw together.  If you have made it though, you know that this is usually "same day only" bread.  No preservatives means this bread is awesome the day it's baked and quickly (too quickly) loses it's charm as time progresses.  You can make some pretty great croutons and bread crumbs with a day old loaf, but my favorite use is french toast.  Of course. 


First the bread of course, and since I can't post the same recipe repeatedly, I tried a sourdough version this time.  

My starter is about 3 months only and only gets better over time.  I poked some holes through a plastic cap, and store my starter in the fridge. Every couple of weeks I dump the starter into a clean quart sized mason jar because the dried crusty starter towards the top of the jar starts to bug me.  Keep feeding this and the starter will become your friend for use in bread, muffins and ... yum ... pancakes! 


This is a perfect weekend recipe in my mind because if you make the dough Friday night before bed, you can have fresh bread on Saturday (I used to give in and buy that $7 artisan loaf every week at the farmer's market) and then have leftover bread for french toast for Sunday brunch.  

French toast...does it need a recipe? I use 2 eggs, 1 cup of milk, 1 tsp cinnamon and 1 tsp vanilla  whisked together (I don't soak the bread for long but if you do, you'll need much more egg/milk mixture), dip the sliced bread, and add to med-high griddle.  Cook until golden and flip--about 3-4 minutes per side.  Top with maple syrup or freshly made blueberry syrup. 


And it goes without saying that this is best served with a nice latte.  Have you tried a Nespresso sample at your local Williams Sonoma or Crate and Barrel?  One latte and I was absolutely sold and this machine came home with me two years ago.  I love him.  Madly, deeply and truly.  

The associate at C&B talked me into the Citiz version with the attached milk frothing unit.  I'd originally wanted the decoupled version so I could store the milk frother in the cupboard but she showed me how the frother shelf could also be used to store espresso cups and the pods in a cute little apothecary jar... oooohhhhh..... so cute....


When it comes to my java though, cute is not going to cut it.  This machine makes a pretty good espresso (said the girl who drank 10-12 a day in Italy). It's not as good as the $2000 espresso maker Williams Sonoma tried to sell me (yeah, nice try) and it's better than a stove top moka pot.  The pods make it as quick and mess free to make a latte as it is to make a cup of Keurig coffee and the pods are similarly priced if you use one pod.  I like my lattes strong so use 2-3 pods depending upon cup size-- 1 pod makes one espresso shot.  The biggest bummer is the exclusivity of the Nespresso pod system...unless you are near a Nespresso store, you have to buy them from Nespresso online.  You definitely have to watch your stash and plan ahead because if you run out, well you are waiting for delivery.  They are little painful on the wallet when you are ordering 200 at a time but I just consider it an investment in my sanity.  Much cheaper than therapy.

Seriously good stuff comes out of this machine.  I like the espresso as much as the lattes--look at the crema on this beauty!  If you love your java and don't mind a little investment for it, this thing is awesome.  Can you tell I love it?


No Knead Cast Iron Sourdough Bread


Sourdough Starter

2 cups all-purpose flour
2 teaspoons granulated sugar
1 packet or 2 1/4 teaspoons of active-dry yeast
2 cups warm water
  1. Mix the flour, sugar, and yeast together in a clean and sterile container (use only glass, glazed ceramic or crockery to hold your starter. No metal or plastic) that can hold two quarts. Gradually stir in the water and mix until it forms a thick paste (don't worry about any lumps, as they will disappear).
  2. Cover the container with a dish cloth and let it sit in a warm counter. The dish cloth will let wild yeasts pass through into the batter. The mixture should bubble as it ferments (this will foam up quite a bit). 
  3. Let it sit at room temperature for 2 to 5 days, stirring it once a day with a wooden spoon. The starter is ready when it develops a pleasant sour smell and looks bubbly.
  4. Once your starter starts bubbling, then start feeding it daily with flour and water according to the directions below. Then stir it, cover loosely and allow a little breathing (can use plastic wrap with a hole punched in) and store it on your counter top or in the refrigerator.  Never store in an airtight container. 
  5. If stored on the counter, you'll need to feed it every 1-2 days which is great if you use it often.  If stored in the fridge you'll want to either use some once every 2 weeks, or dump some out and feed. 
To Feed:
Remove approximately 3/4 to 1 cup of starter (use this starter in a baked item or throw it away). Replace it with same amount (3/4 to 1 cup) of warm water plus(3/4 to 1 cup) flour.  Stir with wooden spoon and store

No Knead Sourdough Bread

Ingredients
1 cup sourdough starter at room temp
3 1/4 cups flour
2 teaspoons sea salt
1 cup water
1/2 tsp yeast (not always needed with sourdough starter, but I still like to add a bit)

Instructions
  1. Pour sourdough starter into a bowl with flour, salt, yeast and water. Mix with wooden spoon until combined. 
  2. Cover bowl with plastic wrap and set aside for 12-16 hours or overnight.
  3. Heat oven to 450 degrees. When the oven has reached 450 degrees place a cast iron pot with a lid in the oven and heat the pot for 25 minutes. 
  4. While the oven and pan is preheating, dump dough onto a heavily floured surface and shape into a ball. Cover with plastic wrap and let rest until pan is ready.
  5. Remove hot pan from the oven and carefully drop dough into ungreased pan. 
  6. Cover and return to oven for 30 minutes. 
  7. After 30 minutes remove the lid and bake an additional 10-15 minutes or until golden brown. 
  8. Remove bread from oven and place on a cooling rack.  Let cool before slicing