Showing posts with label Breakfast. Show all posts

Monday, January 20, 2014

Cottage Cheese Pancakes with Coconut Berry Topping


You thought I'd have another Game Day Broncos recipe today right?  :) :) :)  I'll give you a bit of a break but SuperBowl countdown has already started.   It's been a very long time since we've been in the big one so you betcha, there's more Broncos themed foodie stuff coming up. 


Today though,  I'm sharing the world's easiest pancakes batter and piggybacking off yesterday's  healthier eats theme.  In the blender is oatmeal, coconut flour, cottage cheese, baking powder and vanilla.  I don't add any sugar but if you like your pancakes a bit sweetened, you can add it at this point.  Just a couple of eggs and a couple of minutes blending and the batter is ready to go.  

Yep, easy peasy.  For this recipe, most of the effort is in the topping. 


The topping itself isn't all that time consuming either.  I added a 6oz container each of blueberries and blackberries to a pan along with 2 tbsp of honey and 1/4 cup coconut milk.  I freeze mine in ice cube trays for smoothies when I open a can.  


Cook berries on med-low heat until it forms a thickened syrup. Remove from heat and add one additional 6oz container of fresh blackberries and serve warm.  Or eat it by the spoonful warm.  Either way it's good stuff.  


Next post up isn't quite so healthy but who can say no to any Broncos colored party food? :)  I almost never make puppy chow but when I do, it's shockingly blue.


Cottage Cheese Pancakes with Coconut Berry Topping

Pancake Ingredients
1 cup cottage cheese
2/3 cup oatmeal
2/3 cup coconut flour (or you can increase oatmeal to 1 cup) 
1 tsp baking powder
2 eggs
1 tsp vanilla 

Coconut Berry Topping Ingredients
2 6oz containers of blackberries
1 6oz container of blueberries
2 tbsp honey
1/4 cup coconut milk

Coconut oil for greasing skillet

Directions
  1. Add all pancake ingredients to blender and mix for 2-3 minutes or until smooth.
  2. Lightly grease a skillet with coconut oil and heat over medium heat.  
  3. Pour desired size pancakes into heated skillet.  Cook until golden on the bottom and bubbles form and begin to pop. Flip and cook until golden on other side.
  4. Top with your warm coconut berry topping and serve immediately.

Wednesday, December 11, 2013

Raspberry Sweet Rolls


My cinnamon roll baking a few weeks ago has put me into a bit of a sweet bread baking kick.  The arctic temps might have something to do with it too.    

I'd pinned these raspberry breakfast rolls from Food & Wine a few months ago along with an orange sweet roll recipe and now that my oven is constantly on each weekend, I took the opportunity to finally whip something up.  I couldn't decide between the orange rolls or the raspberry rolls though so I combined the two.  Why not right?

My mom gave me this bowl right before she moved to Vegas.  It was my grandma's bread bowl --it's even engraved with the shop info and "Macomb, IL" right on the bottom.  I'm struck by how I purchase new bowls or even replace perfectly usable bowls with new ones based on color or design, and my grandmother used the same bread bowl from Macomb for so many of her baking years. 


See the little flecks.  Kind of?  Sort of?  Zest of one grated orange definitely gave the rolls a nice citrusy balance to the sweetness of the rolls and the icing.


I was a little worried at this stage as I was convinced these would fall apart during rolling.  I even pushed them into the dough just a bit before rolling them up into a log. 


So far so good.


Turns out my fear was for naught.  You do want to work quickly so the raspberries don't melt before you get it all into the pan for rising.  As the dough rises, the raspberries do release quite a bit of juice all around the rolls.  Turns out, that's not a problem. All of that juice goes somewhere during baking...don't ask me where though. 


I also swapped out the icing recipe for the one I used on the Cardamom Cinnamon Rolls.  I thought that recipe using heavy cream hit the icing needs spot on.


These rolls are more like a sweet danish than they are like cinnamon rolls.  I didn't really think that through so was a little disappointed when the smell of cinnamon rolls didn't fill the kitchen.  One bite though and all disappointment faded.  These were filled with lots of raspberry goodness and definitely a make again recipe.  I think this dough would also be phenomenal filled down the center with a sweet cream cheese filling, topped with the raspberries and then braided up as a more traditional braided pastry.  


Raspberry Sweet Rolls
adapted from Food & Wine Magazine Jan 2011

Ingredients
1 cup milk
2/3 cup sugar
1 1/2 tablespoons active dry yeast
1 stick unsalted butter, softened
2 large eggs
Finely grated zest of 1 orange
1/2 teaspoon fine sea salt
4 1/4 cups all-purpose flour, plus more for dusting
One 10-ounce package frozen raspberries, not thawed
1/3 c sugar
1 teaspoon cornstarch

GLAZE
2 cups powdered sugar
1/3 cup heavy cream
4 tablespoons unsalted butter, melted
1 tsp finely grated orange zest

Directions:
  1. In a small saucepan or microwave, warm the milk gently until it's warm to the touch or about 95-100°. 
  2. Pour the warm milk into the bowl of a standing electric mixer fitted with the dough hook and stir in the sugar and yeast. Let stand about 5 minutes until mixture becomes foamy. 
  3. Add the softened butter, eggs, grated orange zest and sea salt. 
  4. Add the flour and beat at medium speed until a soft dough forms, about 3 minutes. Increase the speed to medium-high and beat until the dough is no longer sticky, about 6-7 minutes
  5. Form the dough into a ball and transfer it to a lightly buttered bowl. 
  6. Cover the dough with plastic wrap and let stand in a warm place until doubled in bulk, 1 to 2 hours.
  7. Line the bottom of a 9-by-13-inch baking pan with parchment paper, allowing the paper to extend up the short sides. 
  8. Turn the dough out onto a lightly floured work surface and, using a rolling pin, roll it into a 10-by-24-inch rectangle.
  9. In a bowl, toss the frozen raspberries with the sugar and cornstarch. Spread the raspberry filling evenly over the dough and gently press into dough. 
  10. Tightly roll up the dough to form a 24-inch-long log.  Cut log into quarters. Cut each quarter into 3 slices for a total of 12 rolls.   
  11. Arrange them in the baking pan, cut sides up.  
  12. Cover the rolls and let them rise in a warm place until they are puffy and have filled the baking pan.  This will take longer than other rolls because the frozen berries lower the temp of the dough.(about 2 hours to rise)
  13. Preheat the oven to 375°
  14. Bake the rolls for about 20-25 minutes, until they are golden and the berries are bubbling. 
  15. While the rolls are baking, whisk the powdered sugarsugar with the butter, zest and heavy cream until the glaze is thick.
  16. Remove rolls from oven and glaze immediately.

Saturday, December 7, 2013

Bananas Foster Breakfast Strata


I love bananas foster.  There's just something about that brown sugar goodness that is irresistible. I'm not the world's biggest ice cream fan but throw some bananas foster on top and I'm there.   

Needless to say, when I saw this bananas foster breakfast pin on Pinterest, it went straight to the front of baking line.  It makes a lot of breakfast though so I'd recommend making it for a crowd--I made it at my sis's house when I was out there for Thanksgiving.  The Mountain Dew bottle is the dead giveaway.  Where my brothers are, the Dew abounds.  


I'm not delusional enough think that using whole wheat bread will somehow make this kind of healthy.  It was a firm bread though and held up in the strata well. 


The result?  It was good, full of banana and brown sugar flavors and definitely reminiscent of bananas foster. I'm not gonna lie though...it was ridiculously sweet.  Of course I acknowledge that my sweet tooth rarely wants play in the mornings.  I think this would be a phenomenal bread pudding type dessert after dinner with a big scoop of ice cream.  If you don't mind your sweets at breakfast, then this is one to try.


Bananas Foster Breakfast Strata

Strata:
1 tablespoon butter
4 medium bananas, sliced
1/3 c OJ
1 cup packed brown sugar
1/2 teaspoon salt
1/2 c half-and-half
1/2 cup granulated sugar
4 large eggs, lightly beaten
2 (12-ounce) cans fat-free evaporated milk
1 (1-pound) French bread baguette, cut into 1/2-inch cubes
Streusel:
1/3 c all-purpose flour (about 1/3 cup)
1/4 cup packed brown sugar
1/4 cup old-fashioned rolled oats
1/8 teaspoon salt
1 tablespoon melted butter
2 tablespoons powdered sugar
Directions:
  1. Preheat oven to 350°.
  2. To prepare strata, heat a large skillet over medium-high heat. 
  3. Add 1 tbsp butter and swirl until foamy. 
  4. Stir in bananas; sauté 1 minute. 
  5. Add OJ, 1 cup brown sugar, and 1/2 teaspoon salt; cook 1-2 minutes until bananas are soft. 
  6. Spoon the banana mixture into a large bowl, and press bananas with a pastry blender or fork until chunky. Combine half-and-half, sugar, eggs, and evaporated milk in a bowl, stirring well with a whisk. Add banana mixture and bread cubes, tossing well to coat. 
  7. Place bread mixture in a 13 x 9-inch lightly greased pan. Bake at 350° for 20 minutes.
  8. To prepare streusel, combine flour, brown sugar, oats and salt and mix well with a whisk. 
  9. Stir in 1 tablespoon melted butter and toss well to coat and form crumbs.
  10. Remove strata from oven; sprinkle evenly with streusel. Bake an additional 30 minutes or until golden and set. 
  11. Remove and let set for 5 mins.  
  12. Sprinkle with powdered sugar before serving.

Monday, November 18, 2013

Cardamom Cinnamon Rolls


I dream of pantries and efficient kitchen storage the way some women dream of spacious closets.  The KitchenAid mixer shelf that raises out of the cupboard when you want to use it and then pivots back into it's own cupboard when you are done?  Seriously, I want to marry the person who thought that one up. 

While my kitchen feels far from efficient or spacious, I cleaned and decluttered a bit...all the resulting workspace made me want to bake, bake, bake.  Wide open counter space is just a canvas screaming for a rolling pin and baking sheets....and cinnamon rolls.  Life in general just screams for fat, fluffy, gooey cinnamon rolls.  

Have you ever tried cardamom?  It's common in middle eastern and indian cooking and is especially fantastic in baked yeasty breads.  Or so I think. 


Unfortunately cardamom is a relatively expensive spice, but if you buy the pods, they last for quite awhile and you really use very few pods in most recipes.  This whole recipe uses just 15 pods.   You pop them open and the inside contains little black seeds that you can throw into a grinder.  You can also buy ground cardamom but I think the pods retain their flavor longer. 

And if you don't like cardamom, you can of course skip it altogether.  Just add a 1/2 tsp of ground nutmeg in its place. 

I'm not always the most patient when it comes to the multiple risings of yeast breads so I love to make the dough the night before and let it rise in the refrigerator overnight.  I wake up, roll it out and only have one rising to wait through. 


This recipe uses an entire stick of softened butter spread evenly over the dough.   The original recipe called for 12 tbsps of butter so I really just made it healthy by cutting out 1/3 of the butter.  Obviously. 


There's something just so comforting about looking over and seeing cinnamon rolls rising on the counter.  This is of course surpassed by the comfort of the warm smell of cinnamon rolls baking in the oven.  


Yep lots of frosting.  This recipe is based on a Food Network Cinnabon copycat recipe and I think FN nailed this recipe. The cardamom just adds a bit of a twist to an already perfect food. 


Not convinced?  Want to see it up close and personal?  Good stuff right? Don't let the 20 steps fool you into thinking Cinnamon Rolls are tons of work.  They are as simple as having the KitchenAid make your dough, letting the yeast do its magic while you sleep, and then just rolling these bad boys out.  Easy peasy and so worth the effort. 


Cardamom Cinnamon Rolls 
adapted from Food Network

For the Dough:
1 cup whole milk
 2 1/2 teaspoons active dry yeast (1 packet)
1/4 cup plus 1/4 teaspoon granulated sugar
4 tablespoons unsalted butter
1 large egg yolk
2 teaspoons vanilla extract
2 3/4 cups all-purpose flour, plus more if needed
15 green cardamom pods (1-2 tsps ground green cardamom)
3/4 teaspoon salt
For the Filling:
8 tbsp softened unsalted butter
1/2 cup granulated sugar
3 tablespoons ground cinnamon
For the Glaze:
2 cups confectioners' sugar
1/3 cup heavy cream
4 tablespoons unsalted butter, melted

Directions
  1. Crack open cardamom pods and remove seeds.  Add seeds to spice grinder and grind well. 
  2. Warm the milk in a medium saucepan over low heat until it reaches about 100. Remove from the heat and sprinkle in the yeast and 1/4 teaspoon sugar (don't stir). Set aside until foamy, 5 minutes. 
  3. Whisk together the melted butter, egg yolk and vanilla and add to milk and yeast.  Whisk well. 
  4. Sift the flour into stand mixer bowl.  
  5. Add remaining 1/4 cup sugar, cardamom, and salt to flour. 
  6. Make a well in the center and pour in the milk and yeast mixture. 
  7. Mix on low speed with the dough hook until thick and slightly sticky. 
  8. Knead on medium speed until the dough gathers around the hook, 6 minutes. Add a bit more flour, tsp by tsp, if necessary.
  9. Butter a medium sized bowl.
  10. Remove the dough and shape into a ball and place in bowl.  Turn to coat the dough in butter. 
  11. Cover with plastic wrap and let rise overnight until doubled (or 1- 1.5 hours depending upon kitchen temp
  12. On a lightly floured surface, roll the dough into a 12-by-14-inch rectangle with the longer side facing you.
  13. Spread with the softened butter, leaving a 1/2-inch border on the far long edge. Mix the sugar and cinnamon; sprinkle over the butter.
  14. Spread with the softened butter, leaving a 1/2-inch border on the far long edge. Mix the sugar and cinnamon; sprinkle over the butter.
  15. Brush the unbuttered far edge with water. Roll the dough away from you into a tight cylinder and press on the long edge to seal.
  16. Cut the cylinder in half with a sharp knife.  Cut each half into half again to form 4 equal sections.  Cut each section into three equal pieces for 12 cinnamon rolls. 
  17. Butter a 9-by-13-inch baking pan; place the buns cut-side down in the pan, leaving space between each. Cover with plastic wrap and let rise until doubled, 40 minutes. 
  18. Preheat the oven to 325.
  19. Bake the buns until golden brown, about 35 minutes. Cool in the pan 15 minutes. 
  20. Meanwhile, make the glaze: Sift the confectioners' sugar into a bowl, then whisk in the cream and melted butter. Transfer the buns to a rack and spoon the glaze on top while still warm.

Saturday, August 31, 2013

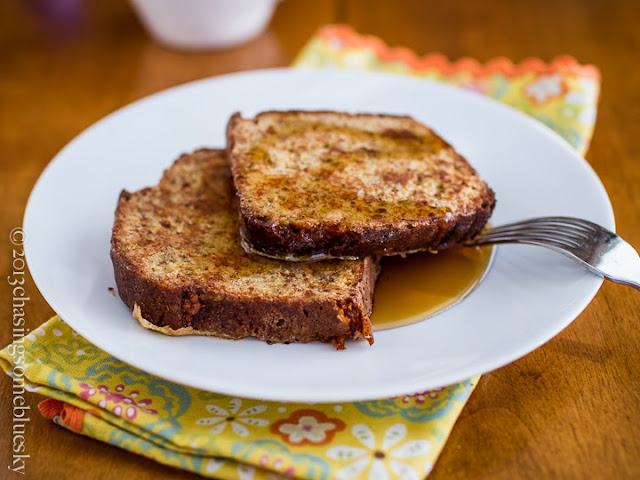
Banana Bread French Toast


A holiday weekend deserves french toast don't you think?  After having turned all of the no knead bread from a former post into french toast, I had to look elsewhere in the kitchen for inspiration. 

This is what I found. 


If you are a family, you may not have any leftover banana bread sitting around.  If you are single like me, maybe you will.   I bake a loaf of anything and I have to take it to the office or else it sits and sits and sits.  I have two half loaves of moldy pumpkin bread I just found in the fridge.  

So yes, one loaf of banana bread, fresh and delicious on day one, quickly became 3 day old forgotten banana bread.  


I do like to turn day/s old goodies into french toast.  As I said in my glazed donut french toast post....you're just adding eggs and milk so really making it healthy right?  He-he.


Can you really write a recipe for french toast?  I use 2 eggs, 1 cup of milk, 1 tsp cinnamon and 1 tsp vanilla  whisked together.  Sometimes if I want to mix it up, I use almond extract instead.  Dip the sliced bread, and add to med-high griddle.  Cook until golden and flip--about 3-4 minutes per side.  Top with maple syrup.  Of course.

Happy and safe Labor Day weekend wishes!

Saturday, August 10, 2013

No Knead Cast Iron Sourdough Bread...French Toast


This is a little bit about a french toast recipe, but more about what to do with all of that leftover no-knead cast iron bread you'll probably be making after the weather slowly moves from hot cruel summer to cool cozy fall.   Yes?  Yes. 

Hopefully you've had a chance to make some of the basic no frills no-knead bread..there's nothing like pulling a loaf of freshly made artisan type bread out of the oven, and it's even better if it only took a few minutes to throw together.  If you have made it though, you know that this is usually "same day only" bread.  No preservatives means this bread is awesome the day it's baked and quickly (too quickly) loses it's charm as time progresses.  You can make some pretty great croutons and bread crumbs with a day old loaf, but my favorite use is french toast.  Of course. 


First the bread of course, and since I can't post the same recipe repeatedly, I tried a sourdough version this time.  

My starter is about 3 months only and only gets better over time.  I poked some holes through a plastic cap, and store my starter in the fridge. Every couple of weeks I dump the starter into a clean quart sized mason jar because the dried crusty starter towards the top of the jar starts to bug me.  Keep feeding this and the starter will become your friend for use in bread, muffins and ... yum ... pancakes! 


This is a perfect weekend recipe in my mind because if you make the dough Friday night before bed, you can have fresh bread on Saturday (I used to give in and buy that $7 artisan loaf every week at the farmer's market) and then have leftover bread for french toast for Sunday brunch.  

French toast...does it need a recipe? I use 2 eggs, 1 cup of milk, 1 tsp cinnamon and 1 tsp vanilla  whisked together (I don't soak the bread for long but if you do, you'll need much more egg/milk mixture), dip the sliced bread, and add to med-high griddle.  Cook until golden and flip--about 3-4 minutes per side.  Top with maple syrup or freshly made blueberry syrup. 


And it goes without saying that this is best served with a nice latte.  Have you tried a Nespresso sample at your local Williams Sonoma or Crate and Barrel?  One latte and I was absolutely sold and this machine came home with me two years ago.  I love him.  Madly, deeply and truly.  

The associate at C&B talked me into the Citiz version with the attached milk frothing unit.  I'd originally wanted the decoupled version so I could store the milk frother in the cupboard but she showed me how the frother shelf could also be used to store espresso cups and the pods in a cute little apothecary jar... oooohhhhh..... so cute....


When it comes to my java though, cute is not going to cut it.  This machine makes a pretty good espresso (said the girl who drank 10-12 a day in Italy). It's not as good as the $2000 espresso maker Williams Sonoma tried to sell me (yeah, nice try) and it's better than a stove top moka pot.  The pods make it as quick and mess free to make a latte as it is to make a cup of Keurig coffee and the pods are similarly priced if you use one pod.  I like my lattes strong so use 2-3 pods depending upon cup size-- 1 pod makes one espresso shot.  The biggest bummer is the exclusivity of the Nespresso pod system...unless you are near a Nespresso store, you have to buy them from Nespresso online.  You definitely have to watch your stash and plan ahead because if you run out, well you are waiting for delivery.  They are little painful on the wallet when you are ordering 200 at a time but I just consider it an investment in my sanity.  Much cheaper than therapy.

Seriously good stuff comes out of this machine.  I like the espresso as much as the lattes--look at the crema on this beauty!  If you love your java and don't mind a little investment for it, this thing is awesome.  Can you tell I love it?


No Knead Cast Iron Sourdough Bread


Sourdough Starter

2 cups all-purpose flour
2 teaspoons granulated sugar
1 packet or 2 1/4 teaspoons of active-dry yeast
2 cups warm water
  1. Mix the flour, sugar, and yeast together in a clean and sterile container (use only glass, glazed ceramic or crockery to hold your starter. No metal or plastic) that can hold two quarts. Gradually stir in the water and mix until it forms a thick paste (don't worry about any lumps, as they will disappear).
  2. Cover the container with a dish cloth and let it sit in a warm counter. The dish cloth will let wild yeasts pass through into the batter. The mixture should bubble as it ferments (this will foam up quite a bit). 
  3. Let it sit at room temperature for 2 to 5 days, stirring it once a day with a wooden spoon. The starter is ready when it develops a pleasant sour smell and looks bubbly.
  4. Once your starter starts bubbling, then start feeding it daily with flour and water according to the directions below. Then stir it, cover loosely and allow a little breathing (can use plastic wrap with a hole punched in) and store it on your counter top or in the refrigerator.  Never store in an airtight container. 
  5. If stored on the counter, you'll need to feed it every 1-2 days which is great if you use it often.  If stored in the fridge you'll want to either use some once every 2 weeks, or dump some out and feed. 
To Feed:
Remove approximately 3/4 to 1 cup of starter (use this starter in a baked item or throw it away). Replace it with same amount (3/4 to 1 cup) of warm water plus(3/4 to 1 cup) flour.  Stir with wooden spoon and store

No Knead Sourdough Bread

Ingredients
1 cup sourdough starter at room temp
3 1/4 cups flour
2 teaspoons sea salt
1 cup water
1/2 tsp yeast (not always needed with sourdough starter, but I still like to add a bit)

Instructions
  1. Pour sourdough starter into a bowl with flour, salt, yeast and water. Mix with wooden spoon until combined. 
  2. Cover bowl with plastic wrap and set aside for 12-16 hours or overnight.
  3. Heat oven to 450 degrees. When the oven has reached 450 degrees place a cast iron pot with a lid in the oven and heat the pot for 25 minutes. 
  4. While the oven and pan is preheating, dump dough onto a heavily floured surface and shape into a ball. Cover with plastic wrap and let rest until pan is ready.
  5. Remove hot pan from the oven and carefully drop dough into ungreased pan. 
  6. Cover and return to oven for 30 minutes. 
  7. After 30 minutes remove the lid and bake an additional 10-15 minutes or until golden brown. 
  8. Remove bread from oven and place on a cooling rack.  Let cool before slicing

Saturday, July 20, 2013

Blueberry Banana Bread


Ever spend time trying to decide between two specific types of muffins?  Last weekend I kept wavering between baking banana bread or blueberry muffins...that's a tough one right?  I wondered what would happen if I didn't choose.  Turns out what happens is happy times and a little party in your mouth. 

This has all the fantastic moist banana flavor of banana bread with big juicy bursting pops of blueberry.  

I had a killer long week at work so I'll leave today's writing at that.  This bread is definitely good stuff!


Blueberry Banana Bread

Ingredients
3 c all-purpose flour
1/2 teaspoon salt
1 tbsp baking soda
2 sticks unsalted butter, at room temperature (8oz)
2 c sugar
1 tbsp pure vanilla extract
2 large eggs, preferably at room temperature
4 very ripe banana, mashed ( 1 1/2 - 1 3/4 cups)
1 cup plain greek yogurt 
1.5 c blueberries, washed and drained
2 tbsp flour for dusting blueberries

For the Glaze(optional):
2 tbsp butter melted
1 cup confectioners sugar
1 tsp vanilla
1 tbsp hot water

Directions
  1. Center a rack in the oven and preheat to 350°F 
  2. Generously grease and flour a 9- to 10-inch (12 cup) Bundt pan. 
  3. Whisk the flour, baking soda and salt together.
  4. In a large mixing bowl, beat butter until creamy. 
  5. Add the sugar and beat at medium speed until pale and fluffy. 
  6. Add vanilla, then add the eggs one at a time, beating well after addition of each egg
  7. Reduce the mixer speed to low and mix in the bananas--batter will curdle
  8. Alternately mix in 1/2 of dry ingredients then  and 1/2 yogurt mixing only well enough to combine.
  9. Toss blueberries with 2 tbsp flour,  Gently fold into banana batter. 
  10. Pour the batter into the pan, tap the pan on the counter to remove bubbles.
  11. Bake for 65-75 minutes, or until a thin knife inserted deep into the center of the cake comes out clean. Check the cake after about 30 minutes - if it is browning too quickly, cover it loosely with a foil tent. Transfer the cake to a rack and cool for 5-10 minutes.
  12. Flip cake onto plate and then again onto cooling rack and cool to room temperature. 
  13. When cake is completely cool, prepare the glaze: In a medium bowl mix together the melted butter, confectioners sugar, vanilla and water. Whisk until smooth.
  14. Line baking sheet with waxed paper and place under rack. 
  15. Drizzle glaze over top of banana bread and let set.