Monday, October 31, 2011

Savory Peach Chicken


Intentions vs reality...it's the yin and the yang in my kitchen.  My produce obsession invariably causes me to purchase way more produce than I know what to do with.  Recently I purchased 6 lbs of ginormous "local" peaches because I was sad at missing the Colorado Palisades peach season and these peaches were just as big...and I was hoping just as flavorful, juicy and sweet.  Not so much as it turns out.  I then thought I'd make peach jam or even try my hand at canning peach pie filling with the less than exciting peaches.

Brooklyn had other plans.  A fair amount of $$$$ handed over to the vet over the weekend and another emergency trip this morning...we played it rather chill in this house today with the little peanut sleeping next to me while I worked from home. Finding the motivation to make jam or pie was a little too ambitious after the emotional roller coaster of the vet visits, but I knew I had to use up at least some of the peaches.

I'd seen this recipe for peach chicken in Ellie Krieger's So Easy cookbook.  I love her.  If I had a billion dollars I'd hire a personal nutritionist to help me plan my meals.  And unlike tons of other healthy recipes, hers are always spot on in flavor-I've never made anything I didn't love.  Okay, except maybe those energy bars from a couple of years back.  This peach chicken was delish though--juicy, fruity and perfect served with rice.  It was a teeny tiny bit too sweet for me but that can easily be fixed by leaving out the brown sugar in the recipe. 


I added one small red onion diced to mine because I love the crisp crunch of slightly cooked onions.  These were not in the original recipe and are of course optional.  


Braising pans are one of my favorites.  Not sure what I love so much about it but even the shape is comforting to me along with the foods that long to be cooked in a braising pan. 


Savory Peach Chicken
from So Easy by Ellie Krieger

Ingredients

  • 1 tablespoon olive oil
  • 4 skinless, boneless chicken breasts, about 1 1/4 pounds
  • 1/2 teaspoon salt
  • 1/4 teaspoon pepper
  • 2 tablespoons brown sugar
  • 2 tablespoons low-sodium soy sauce
  • 2 tablespoons rice vinegar
  • 1/4 cup orange juice
  • 1 teaspoon freshly grated ginger
  • cloves garlic, minced
  • 1/2 cup low-sodium chicken broth
  • 1 small red onion (optional)
  • 4 large firm-ripe peaches, cut into 1/4-inch slices, or 2 (10-ounce) packages frozen peaches, (about 4 1/2 cups)
  • 2 tablespoons sliced almonds

Directions

  1. Heat the oil in a large skillet over a medium-high heat. Season the chicken on both sides with salt and pepper, add to the skillet and cook until browned, about 2 minutes per side. Meanwhile combine the brown sugarsoy sauce, rice vinegar and orange juice in a small bowl and set aside. When the chicken is browned, transfer to a plate and set aside.
  2. Add the ginger and garlic to the pan and cook, stirring, for 30 seconds. Add sliced onions and then the chicken broth, the soy sauce mixture, and the peaches to the pan. Turn the heat up to high and cook, uncovered, for about 6 minutes, stirring occasionally until the sauce is nicely thickened and the peaches soften. Add the chicken back to the pan with the sauce, turn the heat down to moderate-low, cover and cook for about 5 minutes, or until chicken is cooked through.
  3. In the meantime, toast the almonds in a dry skillet over a medium-high heat stirring frequently, until golden brown and fragrant, about 2 minutes.
  4. Serve the chicken topped with the sauce and sprinkled with the toasted almonds.

Saturday, October 29, 2011

Eggplant Parmesan Pizza


Do you ever get a food craving that stays with you for weeks?  Usually it's something I've had before, but in this instance, it was something I'd seen on a menu.  

When my parents were here, I'd picked up a couple of pizzas one night on my way home from work.  One thing about Vegas is it's definitely its own little melting pot.  The number of people I've met that are Las Vegas natives is pretty small and it's quite fascinating to see where everyone is from.  That translates into some pretty diverse food, restaurants and grocers.  There's one grocery store here, Glaziers,  that specializes in special request food items from other geographic areas.   Walking through the store you can find some NY Peter Luger's steak sauce (so delish on sliced tomatoes and onions), TastyKakes from Philly, fresh(frozen) pastas and sauces from Brooklyn and even Lyle's Golden Syrup from England.  Yes, this city is like a mini NYC with its food choices.  All that to say that I've found some pretty great NY style pizza here with it's enormous floppy pieces that you have to hold with two hands.  When I was picking up the pizza for my family I'd seen an eggplant parm pizza on the menu that I was so drawn to.  While it's definitely not the type of pizza I pick up for Dad,  I've been fixated on the idea since.   Eggplant parm is one of my favorites and throwing it on a pizza couldn't be too shabby.  

I started with homemade croutons in place of breadcrumbs.  You could of course use Italian flavored breadcrumbs but I like the crunch and the fresh flavor that comes with homemade croutons.  Add a bit of parmesan and dried basil along with the croutons before you pulse.


I choose to bake my eggplant but you can also pan fry them until golden after breading them. I've also seen pre-breaded eggplant at Trader Joe's all ready to throw into an eggplant parm.  It's pretty intriguing actually.


Garlic oil is available at just about any grocery store but I like to make my own and keep it on hand for just about everything. It's pretty handy ingredient to have on hand. 


Any favorite tomato/pasta sauce could be used instead of canned diced tomatoes.


This definitely isn't a pizza for the carb conscious...pizza crust plus breaded eggplant equals lots of yummy carbs.  I loved this variation of eggplant parm--it seemed lighter without all of the additional tomato sauce and layers of cheese.  It seems like the kind of eggplant parm that just goes better with iced tea or beer than a big glass of red wine. 


Eggplant Parmesan Pizza

1 small eggplant
3 cups croutons
1/2 cup shaved or crumbled parmesan
1 tsp dried basil
2 eggs, beaten well
1 tsp garlic powder
1/2 tsp salt
1/4 tsp freshly ground black pepper
1 lb pizza dough
garlic oil
14oz can Italian seasoned diced tomatoes
1/3 cup fresh basil
8 oz mozzarella thinly sliced (or grated)

  1. Preheat oven to 400 degrees f and lightly oil baking sheet
  2. Add croutons, 1/3 cup of the parmesan and dried basil to food processor and pulse to coarse crumbs.  Pour crumbs into shallow dish and season with salt, pepper and garlic powder
  3. Beat two eggs well in another shallow dish
  4. Thinly slice eggplant(I sliced mine less than 1/4 of an inch).  Dip in eggs and then into crumbs, coating entirely.  Lay on baking sheet. Repeat until all eggplant is coated
  5. Bake on middle rack for 8 mins,  remove from oven and turn eggplant.  Return to oven and bake additional 7 minutes then remove from oven and set aside
  6. Lightly grease another baking sheet (or reuse baking sheet from eggplant.  Remove eggplant taking care not to stack the eggplant--stacking will cause eggplant to steam and make crumbs coating soggy)
  7. Hand stretch dough.  Lightly brush with garlic oil
  8. Drain juices from tomatoes, crush tomatoes with hands and sprinkle across dough
  9. Top with cooked eggplant.  Tear basil into pieces and sprinkle across eggplant.  Top with mozzarella slices and remaining 1/3 cup parmesan.
  10. Bake for 15 minutes or until crust is golden brown.  Serve immediately

Wednesday, October 26, 2011

Butternut Squash Mac-N-Cheese


I've been checking the weather on my iPhone for the past hour.  I've refreshed it about 5 times because I can't believe what it's telling me.  See, I turned off my A/C...for awhile I hope.  Finally.   And tonight I took Brooklyn out for a walk and realized it was freezing.  I kid you not, grab your hat, scarf, mittens and snow boots cold.   I loved it.  I imagined that the snow might begin falling at any moment.  I gleefully anticipated sleeping with the window cracked a bit tonight because nothing is better than fall nights under the down comforter, with a little fresh autumn air coming through an open window.  

Yep, cold enough to make a big comfy pan of mac-n-cheese cold.  I added a cup and a half of butternut squash to the recipe because squash is that fantastic. I also added a half cup of cubed cheddar because I love when I get a bit with just pure melted cheddar goodness. 


Everything about butternut squash mac-n-cheese screams cold weather comfort food--perfect since the weather has turned truly chilly here in Vegas, even if my ridiculous phone insists that it's 64 degrees. This Colorado girl knows that 64 is hardly cold--64 degrees isn't jacket weather.   I know I wrote about this just a few weeks ago but I cannot believe that anyone can really acclimate to a new climate in just one summer.  Nope, iPhone must be wrong

Even if it's not, mac-n-cheese is a perfect meal even for 64 degree weather. 


butternut squash mac-n-cheese


3 tablespoons butter, plus more(or oil) for casserole dish or pan
2 lb butternut squash

1/4 cup  flour
1/2 teaspoon mustard powder
1/4 teaspoon freshly ground black pepper
1/4 teaspoon onion powder
1 teaspoon sea salt
2 cups milk
2 cups grated sharp cheddar cheese
1/2 cup grated Gruyère
1/2 cup cheddar--cubed smallish

1/2 pound elbow macaroni
1/2 cup bread crumbs mixed with additional 2 tbsp butter, melted
  1. Heat oven to 400 degrees f.  Poke outside of squash a few times with fork.  Place on baking sheet in oven and cook until squash is tender and can easily be pierced with fork.  Remove from oven and let cool  enough to handle (or can be done the day before and refrigerated until ready to use)
  2. Cover a large pot of salted water, and bring to a boil.
  3. Cut squash in half and use large spoon to scoop out cooked squash.  Add 1 1/2 cups to large bowl and mash well. 
  4. Meanwhile cook the macaroni until the outside of pasta is cooked and the inside is underdone, 5 to 6 minutes. Pour macaroni into a colander, rinse under cold running water, and drain well.  Add to squash.
  5. Preheat oven to 375°F. Butter a 2 quart casserole dish (or grease a cast iron skillet) well
  6. Melt butter in a pan over medium heat. When the butter bubbles, add the flour and spices. Cook, stirring, 2 minutes. This is super duper important as it cooks out the grainy raw flour taste.
  7. While whisking, pour in milk and whisk vigorously while heating. Continue cooking, whisking constantly, until the mixture bubbles and becomes thick.
  8. Remove the pan from the heat. Stir in shredded cheddar cheese, and Gruyère and stir well.  Pour over noodles and squash
  9. Add cubed cheddar and stir again.
  10. Pour the mixture into the prepared dish and sprinkle the breadcrumbs over the top. 
  11. Bake until golden brown, about 20-25 minutes.


Monday, October 24, 2011

Lime Yogurt Loaf


With all of the cinnamon and pumpkin deliciousness of the past month, I was kind of in the mood for a little break and what is a better break than a little citrus yumminess?  Barefoot Contessa's Lemon Yogurt Cake is one of my favorite go-to citrus recipes--it's tart, moist and I love that it uses yogurt.  I mixed it up this time and made it with limes....and a little spinach.  My obsession with putting spinach into any many foods as possible probably isn't surprising to anyone who knows me, but in this instance, it wasn't for the taste or the health benefits.  

Nope, it was just for the color. 

Spinach as it turns out, is a fantastic natural food coloring--it's eerily food-coloringesque in the photos right?    I saw a phenomenal looking lime tart just recently (I don't recall the site) and she used a bit of spinach to just make the green pop a little.   Genius.   Even I would admit that spinach and lime flavored cake might be too out there. In this loaf though, the spinach adds the fun green color without even a bit of spinach flavor.  Verily.  


I bumped up the amount of lime zest to a full tbsp but if you like subtle lime, you could use 2 tsp.  I also added lime zest to the glaze because I am a citrus glutton apparently. I think it was the perfect amount of lime.


Lime Yogurt Cake
adapted from Barefoot Contessa at Home

Ingredients

  • 1 1/2 cups all purpose flour
  • 2 tsp baking powder
  • 1/2 teaspoon salt
  • 1 cup yogurt, drained 
  • 1 1/3 cups sugar, divided
  • 3 large eggs
  • 1 tbsp grated lime zest (3-4 limes)
  • 1 tsp vanilla extract
  • 1/2 cup vegetable oil
  • 2-3 tbsp frozen spinach, thawed and squeezed to remove water
  • 1/3 cup freshly squeezed lime juice

For the glaze:

  • 1 cup confectioners sugar
  • 2 tablespoons freshly squeezed lime juice
  • 1 tsp grated lime zest

Directions

  1. Preheat the oven to 350 degrees f 
  2. Grease and flour loaf pan
  3. Add oil and spinach to a blender and blend 1-2 minutes
  4. In a medium bowl whisk together flour, baking powder, and salt.
  5. In a large bowl, whisk together the yogurt, 1 cup  of the sugar, the eggs, lime zest and vanilla. Slowly whisk the dry ingredients into the wet ingredients. 
  6. Gently stir the spinach oil into the batter and ensure it's fully mixed in. 
  7. Pour the batter into the prepared pan and bake for about 45-50 minutes, or until a cake tester placed in the center of the loaf comes out clean.
  8. Meanwhile cook the 1/3 cup lime juice and remaining 1/3 cup sugar in a small pan until the sugar dissolves and the mixture is clear. Set aside.
  9. When the loaf is done, allow it to cool in the pan for 10 minutes then remove loaf from pan and cool on cooling rack.  Place baking sheet underneath cooling rack and pour the lime-sugar mixture over the loaf and allow it to soak in. 
  10. For the glaze, combine the confectioners sugar, 1 tsp lime zest and lime juice and pour over the loaf and let harden.

Sunday, October 23, 2011

Chocolate and Coconut Mochi


Mochi has a sweet chewiness that's difficult to explain to anyone who hasn't had it...it's kind of like a firmer chewy marshmallow.  It might be an acquired taste, but it's definitely one of my favorite desserts and I love that it's becoming more mainstream and easier to find. Trader Joes sells mochi wrapped around ice cream, and almost every frozen yogurt shop has mochi as a topping option.  

While mochi is traditionally thought of as Japanese,  many Thai desserts use sweet rice flour.  The flavors are so reminiscent of Thailand to me...the coconut and pandan flavored treats are available at markets each morning and afternoon and pretty impossible to pass up. 

What my lazy self likes about mochi cake is how unbelievably easy it is to make--the ingredient list is pretty short.  Most essential is sweet rice flour as it's what lends the chewy texture you associate with mochi.   If you've ever had Thai sweet/sticky rice, you can probably see where the chewy texture comes from.

Probably the most popular and well known brand of sweet rice flour is Mochiko and it can be found in just about every asian grocer and some mainstream grocers.  There's also a lesser known Thai brand available at most of the asian grocers as well...labeled "glutinous rice flour" and about half the price.  I've found that they both produce the same quality mochi.  


The japanese sometimes fill the mochi and it's called daifuku...also tasty but a little more work than making a mochi cake. 


I only topped half of this mochi cake with chocolate as I was concerned the chocolate would overpower the flavors in the mochi.  My fear was for naught though...the chocolate and coconut paired well together.  I have a pumpkin mochi recipe that I love--I'm wondering if chocolate might pair with that as well.


Chocolate Coconut Mochi

1 cup granulated sugar
3 tbsp melted butter
2 eggs
1 can coconut milk
1 tsp vanilla extract
1 tsp coconut extract
1 2/3 cup glutinous rice flour or Mochiko
1 teaspoon baking powder
2/3 cup sweetened, flaked coconut
2/3 cup mini chocolate chip morsels


Directions
  1. Preheat the oven to 350 degrees. Line an 8x8 inch baking dish with parchment. 
  2. In a medium bowl, whisk together the eggs, coconut milk, extracts and melted butter. 
  3. In a large bowl, whisk together the rice flour, sugar, and baking powder. 
  4. Pour the coconut milk mixture into the dry ingredients, and stir well. Pour into the prepared pan. 
  5. Bake for 20 minutes then top with chocolate chips and coconut. Bake additional 15-20 minutes until coconut is toasted. 
  6. Cool completely, then cut into squares to serve.

Monday, October 17, 2011

Santa Monica


My parents are still in town and while we've done a bit of Thai cooking, not a lot of camera time has happened...at least not in the kitchen.  I did of course have my camera for our trip to California this past weekend and actually decided to really try out my 70-200mm lens. 

I've loved the few pictures I've taken with it, but this is not a light lens, and because it's so long, you really need distance between you and the subject. This sometimes felt right when trying to capture candid type photos, but made running far ahead of Chipmunk in order to capture her walking towards me quite the workout. This does move goal #33 Take photographs on a beach, over to the completed side. Thanks to my sister, brother in law, niece and parents for allowing me to repeatedly point in their direction and click away.


I could easily get used to watching the sun set over the water.

Friday, October 14, 2011

Boston Terrier Pumpkin Fun


My parents both have fall birthdays so my sister and I schemed to fly them in to visit us and blogging(cooking really) has taken a back burner while they are in town.  We're heading out to Cali this weekend for a bit-o-walking-on-the-beach-time.  I'll leave you with this fun BHG site that has tons of free dog breed stencil just in case you haven't already found the site.  Word of advice: pay particular attention to the eyes before you start just chopping pumpkin away.

Surely I won't be giving up my day job soon.

Yep, dogs on pumpkins.  It's genius really.

Brooklyn says "peace out peeps."  Have a great weekend all!

Tuesday, October 11, 2011

Cider-Braised Chicken & Vegetables


This week's holiday recipe exchange theme is one-pot meals.  I love one-pot meals.  And this week's sponsor is Le Creuset. You know it...I love Le Creuset.  It's such a vibrant colorful rainbow to look at, fantastic cookware and hand weights all in one.

I volunteered last week to make a dinner for someone at church who'd just had surgery.  I'd seen this recipe for Cider-Braised Chicken in The Ski Country Cookbook awhile ago but just hadn't gotten around to making it.  AND it just happens to be a one pot meal.  Three birds with one stone isn't too shabby.

Cookbook # 79, The Ski Country Cookbook is exactly what you would imagine it to be...great hearty recipes for cold weather eating including recipes for oatmeal with orange marmalade and toasted pecans, wild mushroom, chicken and orzo soup, italian-style chicken stew and chilis.

This Cider-Braised chicken was tasty, or it was from what I could tell from the sauce and bite of the carrots.  I took this opportunity to actually use  bone-in chicken breasts.  I know that bone in meats are extra flavorful and juicy and they actually look like a lot of fun to cook.   I love the idea of throwing a skin-on, bone-in chicken down into a big dutch oven...that just feels cozy and rustic.  I have a weird aversion to any meat on a bone so very rarely get to make something like this,  but since this was for another family, I went for it.  The skin was dark and crispy looking and looked so fabulous when added back into the cider and white wine mixture.   Of course you can't tell that from the photos but I didn't think I should be plating and playing with someone else's food before placing it back into an aluminum takeout container for delivery.

Come join the fun at the My Baking Addiction and GoodLife Eats Holiday Recipe Exchange sponsored by Le Creuset.


Cider-Braised Chicken and Vegetables
adapted from The Ski Country Cookbook by Barbara Scott-Goodman

2 1/2 lbs chicken breasts, bone in
salt and pepper 
3 tbsp Olive OIl
4 shallots finely diced
1 1/2 cups apple cider
1 cup dry white wine
1 tsp cider vinegar
3 medium carrots peeled and cut into 1 inch pieces
2 large potatoes scrubbed and cut into 1 inch dice
2 medium parsnips, peeled and cut into 1 inch pieces
2 tbsp dijon mustard
2 tbsp fresh lemon juice
1 tbsp cornstarch mixed with 1/3 cup water
  1. Rinse chicken and pat dry.  Season with salt and pepper
  2. In large dutch oven, heat oil over medium heat.  Add chicken in two batches, skin side down and cook until skins crispy and brown, about 5-7 minutes. Remove from pan and set aside
  3. Add shallots to pan and cook over medium heat until softened, about 1 minute.  Deglaze pan by pouring in the cider and wine and bringing to a boil, scraping brown bits from bottom of pan.  Reduce heat and simmer for 5 mins
  4. Add vinegar, salt and pepper to taste. Return chicken to pan.  Add carrots, parsnips and potatoes. Bring to a boil and simmer over low heat until vegetables are tender, about 25 to 30 mins.
  5. Transfer chicken and vegetables to serving dish.  Bring sauce to full simmer and add mustard and lemon juice.  Whisk until well combined.  Whisk cornstarch and water again and then add to pan, whisking well to incorporate.  Cook 30 seconds until sauce thickens.  Pour over chicken and serve immediately.


Sunday, October 9, 2011

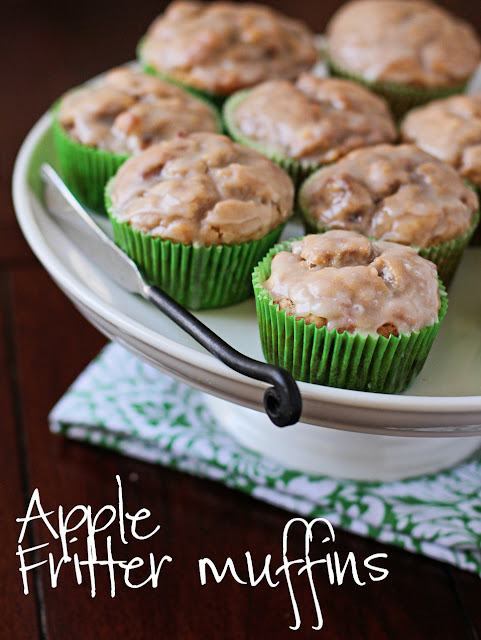
Apple Fritter Muffins


There are two areas of the grocery store that I know to avoid if I happen to go shopping on an empty stomach...the deli with the chicken strips and fried potatoes, and the donuts.  Why exactly are fried foods so tasty?  I learned long ago to just walk the other way rather than try and fight the temptation.

Every so often though I give into the siren song of the apple fritter...crispy fried exterior, soft donut and cinnamony apple insides all wrapped up with a yummy sugary glaze.  Rather than completely deprive this house of apple cinnamon goodness, I've combined all of the same flavors, minus the fried yumminess, into a muffin.  I won't pretend it's healthy with the double dip into the glaze, but it has to be a bit healthier than it would be if it was tossed into a deep fryer. 

Of course you have to start with the apples.  I chose granny smiths, but you could probably use a sweeter apple and then reduce the sugar needed for cooking the apples. 


After the apples are cooked, toss them with the 1/3 cup flour to prevent them from sinking during baking.  It's important not to over mix muffins to keep them tender.


Let them cool for a bit before you dip in the glaze.  You could reduce the dipping to just one time, but this is a scenario where double dipping is good.  Yes, very, very good. 


While it takes about an hour to let the glaze harden, it's so worth it.  That crispy glazed topping makes it hard not to pull of the entire top and eat it first.   

This muffin is definitely more muffin than it is fritter, but the apples, cinnamon and glaze are pretty satisfying even without the bath in the deep fryer. 


***Updated with a couple of steps that were left out...sorry about that! :) ***

Apple Fritter Muffins

For the Apples:
2 large granny smith apples, 1/4 inch dice
3 tbsp butter
1/3 cup granulated sugar
2 tsp cinnamon
2 tbsp water
1/3 cup flour

For the Muffins:
2 large eggs
1/4 cup applesauce
1/4 cup canola oil
1 cup granulated sugar
1/3 cup brown sugar
1 tsp vanilla extract
2 1/3 cups all-purpose flour
1 1/2 tsp baking powder
1/2 tsp baking soda
3 tsp cinnamon
1/2 tsp salt
1 cup buttermilk

For the Glaze:
2 tbsp butter melted
1 cup confectioners sugar
1 tsp vanilla
1 tbsp hot water

Directions:
  1. Preheat oven to 400 degrees F. 
  2. Line 14 muffin cups with muffin liners 
  3. In a skillet add add apple ingredients except flour and cook over medium heat until apples are tender, about 10 minutes.  Stir in flour to coat apples (this prevents apples from sinking to bottom of muffins)
  4. In a medium bowl whisk together flour, baking powder, baking soda, cinnamon and salt
  5. In a large bowl beat together applesauce, oil, and sugars till smooth. Beat in eggs, one at a time. Add vanilla and mix thoroughly  
  6. Stir the flour into the butter mixture alternately with the buttermilk, beginning and ending with the flour and making sure everything is thoroughly combined. Gently stir in apples until just combined
  7. Spoon batter into cups, filling the cups, and smooth tops. Divide batter equally among prepared muffin cups. Bake until muffin tops are a pale golden and springy to the touch, 15 to 17 minutes, rotating halfway through baking time.
  8. Cool muffins in pan for 5 minutes, then transfer to wire rack and cool 10 minutes before glazing. 
  9. To make the glaze, In a medium bowl mix together the melted butter, confectioners sugar, vanilla and water. Whisk until smooth. 
  10. When muffins have cooled slightly, dip the muffin top into the glaze and allow the glaze to harden. Once hardened, dip a second time and allow to harden before serving.

Saturday, October 8, 2011

Pumpkin Spice Biscotti


It's hard to stay away from pumpkin too long.  This pumpkin comes in the form of a super crunchy biscotti perfect for dipping in a piping hot cappuccino. 

Pumpkin spice lattes are everywhere, it's usually the first scent I smell when I walk into my office in the fall.  I have to admit that I succumb the sweet, spicy temptation at least once a year...it's like of rite of passage leading to each fall.  Sadly though, as tasty as it is, I prefer my coffee to be pure unsweetened coffee flavor, so that one pumpkin spice latte order each year is it for me.  I have more than a little bit of envy whenever I smell a pumpkin spice latte, wishing I wanted to drink it as much as I love the idea of drinking it.  

That pumpkin spice coffee scent is indeed one life's great scents. 

The solution to this came to me a couple of years ago when I saw a posting for pumpkin biscotti on Southern Living. In this scenario, I get that wonderful pumpkin spice flavor, but my coffee is pure java flavor with a bit (or a lot) of milk thrown in.  

Love biscotti. 


I dipped some in white chocolate and drizzled others with the white chocolate.  I think these are actually better without the white chocolate as it's a little too sweet with the drizzle.  But the white chocolate ones look cuter and eating cute food is important.


With our first breath of cool air here in Las Vegas, it's time to transition back to hot lattes.  I take lattes pretty seriously...given a choice between an espresso after dinner or a glass of wine, I am grabbing the espresso.   I'm convinced that coffee is the elixir of heaven.

Since I spend a considerable amount of time making coffee in this house, thought I'd share this easy, espresso machine free way to make a latte or cappuccino at home.  Granted, I understand that one of those $400 grinders grinds the perfect bean without altering the flavor and those thousand dollar machines are able to pull an espresso that cannot be replicated at home (YUM!) but this poor man's latte making makes a pretty tasty latte.

Remember the moka pot from the pumpkin spice protein shake post?(which by the way is a coffee addition to a shake and not a flavored coffee--it's obviously different...maybe)  Yep, start by putting on a pot of espresso in the moka pot. While that is brewing, pour about 1/2 cup of milk into your cup. Skim and 1% foam really well.  I've never tried 2%, whole or nut milks.  


Grab one of those milk frothers (just $15 at a kitchen store or less if you can find one at TJ Maxx).  Froth the cold milk--this takes under 30 seconds.  Froth more for cappuccino, less for latte.  I got carried away while taking photos, so we are making a cappuccino here. The best part is there is no machine to clean, all you have to clean is this little electric whisky thing by running it under water...yay!


Heat the milk in the microwave.  Watch it the entire time...it inflates like crazy.  I usually have to turn it off at 30 seconds and let it deflate a bit before finishing the warming. 


This makes a crazy solid foam...no wimpy foam here. 


Pour in your desired amount of espresso and stir.  Not a Starbucks, but when you drink about 3-5 of these a day like I do, it's a pretty economical version to make it at home and goes perfectly with pumpkin spice biscotti. 


Pumpkin Spice Biscotti
Ingredients:
  • 3 1/2 cups all-purpose flour
  • 1  cup sugar
  • 1 1/2 tsps baking powder
  • 1/2 tsp. salt
  • 2 tsp pumpkin pie spice 
  • 1/2 cup pumpkin puree
  • 2 large eggs
  • 1 tsp almond extract
  • 1 tsp vanilla extract
  • 4 tbsp butter melted
  • 2/3 cup sliced almonds, toasted (optional)
  • 1/2 bag white chocolate chips, melted with 1/2 tsp shortening  (optional)
  1. Preheat oven to 325.
  2. Combine flour, sugar, salt, baking powder, and pumpkin pie spice in a large bowl and whisk together.   
  3.  In another bowl whisk together pumpkin, eggs, melted butter, extracts and pumpkin pie spice.  
  4. Slowly add flour to pumpkin mixture and stir until dry ingredients are moistened. Gently mix in almonds
  5. Place dough on a lightly floured surface and divide into 2 portions. Lightly flour hands and shape each portion into long log the length of a full baking sheet.  Bake for 30 minutes; remove from oven and reduce oven temp to 300.
  6. Cool log for 15 mins then transfer to a cutting board. Using a serrated knife, cut into 1/2″ thick pieces, slicing at a slight angle.  The interior of each biscotto will still be just a little moist 
  7. Place the biscotti with a cut side facing up on a half sheet pan and bake for 10 minutes. Remove the pan and flip all the biscotti over so the other cut side is now facing up. Bake for another 10 minutes. Set all the pieces on a wire rack to cool. 
  8. Once the biscotti have cooled, drizzle with melted white chocolate. (To melt the chocolate, pop it in the microwave and heat for 30 seconds, then stir.  Place back in microwave and heat in 15-second intervals and stirring in between until chocolate is melted. Alternately, dip 1/4/-1/2 of each biscotti in chocolate.  Store in airtight container.