Sunday, February 26, 2012

Desert Photography Workshop


Last weekend I popped out of bed at 3:30AM to join a group for a photography workshop.  I think I could become addicted.  


Every spring photographers descend upon Vegas for WPPI.  With so many professional photographers in one place, there are workshops galore and I knew I had to take advantage of that before I moved back to Denver, especially since taking a photography workshop is on my 101 goal list. 

I love Charleton Churchill's photography and his style...vibrant colors, artistic lighting and creativity galore.  When I saw he was having a workshop, I signed right on up.  He has a creativity and editorial flair I think that separates his work.  In fact, when I saw the photo he posted from this same shoot I was struck by how I had nothing even similar.  Same models, same space... completely different images....I find negative space a bit overwhelming, he played it up.  

I've been tempted to take other workshops as well but most seemed to either be geared towards "how to use your DSLR" or if they are more photography based, tend to have quite a bit of time on building your own photography business.  All good stuff I'm sure, but geared towards another audience.  Charleton's workshop was a one day shoot with tips and pointers and instruction...he even let us pick his brain during lunch. I was the only hobbyist photographer shooting but felt very welcome and learned tons.  Can't wait to unpack some boxes and play with my off camera flashes.  And of course learn to embrace negative space on occasion.

I took close to 600 photos and with all that's going on right now have not had time to really go through them. Have to say that shooting models is pretty easy as it turns out...they pretty much can't take a bad picture.  Fun, fun, fun, fun, fun!


Thursday, February 23, 2012

Chicken Marsala

Yep, you either love mushrooms or you hate them.  Is anyone truly ambivalent when it comes to these little suckers?  I happen to love them.  I'd take mushroom pizza over pepperoni ANY day.  It's a given then that Chicken Marsala is right up there on my favorite dinners.  And luckily it's pretty darned easy to whip up.


Confession time: I didn't make this tonight.  I didn't even make this recently.  Someone asked how I was still even cooking with my moving plans in full swing.  I'm not.  I do however have quite a few photos of recipes I never got around to posting ever so thought I'd post them while I'm not doing much cooking.  I have plenty of canned items to use up but work is actually killing me right now.  The whole two week notice, short timers thing?  Yeah not so much.  Of course, I chose to wait to give notice so that my last day fell after a major project go-live.  At the time it seemed like the right thing to do.  But now, during the days leading up to the go-live, when I eat a bite of lunch with each quick hit of the mute button on a conference  call or I wake up at 2:00am with a stomachache because I'm thinking about the go-live in my sleep?  Have to admit, I wonder what on earth I was thinking.

I cried on the drive over to pick up Brooklyn from doggie daycare tonight.  Not because of any identifiable reason, but just because I was just emotionally spent from the day and the stress and knowing I still had so much moving stuff to do in my free time.  The sun had just set over the mountains and the sky was the most vibrantly beautiful orange I've seen since I've been in Vegas.  I wondered why I'd never truly noticed the sunset here before.  My emotional slightly crazy, slightly whiny self asked God why days have to so long and hard sometimes and beautiful things like sunsets are so quick and seemingly fleeting.   What I realized after my car ride prayer time was that days can be hard and draining but then they are over, but sunsets are a constant enduring recurrence we can count on.  It was just a slight perspective change but sometimes that's what is needed.  Maybe some chicken marsala helps too..I wish I did have this for dinner tonight. 


CHICKEN MARSALA

Ingredients
4 skinless, boneless, chicken breasts
All-purpose flour for dredging
Enough extra-virgin olive oil to coat bottom of pan (about 1/4 cup)
4 oz bacon, diced
8 ounces crimini or porcini mushrooms sliced
1/2 cup sweet Marsala wine
1/2 cup chicken stock
2 tablespoon unsalted butter

Directions
  1. Lay the chicken breasts on a plastic wrap covered cutting board and lay another piece of plastic wrap over them; pound with a flat meat mallet, until they are about 1/4-inch thick. 
  2. Add some flour in a shallow dish and season with a fair amount of salt and pepper; mix with a fork to distribute evenly. 
  3. Heat the oil over medium-high flame in a large skillet. When the oil is nice and hot, dredge both sides of the chicken cutlets in the seasoned flour, shaking off the excess. 
  4. Place the chicken in the pan and fry for 5 minutes on each side until golden, turning once – do this in batches if all of the pieces don't fit in the pan. Remove the chicken to a large platter to keep warm. 
  5. Lower the heat to medium and add the bacon to the drippings in the pan, saute for 2-3 mins to render out most of the fat. 
  6. Add mushrooms and cook until browned and their moisture has evaporated, about 5 minutes; season with salt and pepper. 
  7. Pour the Marsala in the pan and boil down for a few seconds to cook out the alcohol. Add the chicken stock and simmer for a minute to reduce the sauce slightly. Stir in the butter and return the chicken to the pan; simmer gently for 1 minute to heat the chicken through. Season with salt and pepper and garnish with chopped parsley before serving.


Tuesday, February 21, 2012

Moroccan Chicken And Quinoa


A recipe post with no commentary?  Shame on me, but I'm back to packing.  Wanted to share this little gem from my cookbook du jour, Quinoa 365. This is my 5th recipe from the book and each one's been a hit.  Next time I make this I would personally reduce the honey in the quinoa as it was a bit sweet for me, but otherwise, would absolutely make it as is again.  The crunch of the pecans with the spice of the cinnamon was a perfect pair for the quinoa.


MOROCCAN CHICKEN & QUINOA
from Quinoa 365

1/2 tsp ground cinnamon
1/4 tsp ground ginger
1/4 tsp ground turmeric
1/4 tsp ground coriander
2 tbsp butter
4 boneless, skinless chicken breasts
1 cup diced onion
1 cup water
2 tsp orange juice
pinch salt

For the quinoa:
2/3 cup quinoa
1 1/3 cups water
1 tbsp butter
2 tsp honey
1/2 tsp salt
1/2 tsp ground cinnamon
  1. To prepare the chicken, combine the cinnamon, ginger, turmeric and coriander in a small bowl and set aside.
  2. Melt the butter in a large saucepan on medium heat and place the chicken breasts in the pan. Fry for about 5 minutes, until they are nicely browned. Flip the chicken over and add the onion, water, garlic, orange juice and salt. Toss in the spices.
  3. Cover and bring to a boil, then reduce to a simmer and cook for about 20 to 25 minutes, until the chicken is no longer pink.
  4. While the chicken is simmering, prepare the quinoa by bringing the quinoa and water to a boil in a small saucepan. Reduce to a simmer, cover and cook for 10 minutes. Turn the heat off and leave the covered saucepan on the burner for an additional 7 minutes. Remove the lid and fluff with a fork.
  5. Remove the quinoa from the heat and toss with the butter, honey and salt. Stir in the cinnamon.
  6. To serve, divide the quinoa among 4 plates and top each with a piece of chicken. Pour the sauce over top. Refrigerate leftovers for up to 2 days.

Friday, February 17, 2012

White Bean Coconut Loaf

There hasn't been as much cooking and baking happening in my kitchen as I'd like, but as I alluded to in a previous post, there was a reason.  It looks a little like this...


Most of my pans and baking dishes have been packed up since right around the beginning of the year. I hate moving.  I know it's probably not anyone's favorite activity, but I really hate it.  The only way I could get through the idea of packing everything was to force myself to pack 2-3 boxes every night.  Here we are almost two months later and there are a lot of boxes stacking up in this apartment.  Since I did just give notice, I can officially say I'm moving back to Denver next month.  

I've loved spending more time with my sis and watching little Chipmunk grow so quickly.  I've loved the development opportunities in my position here in Vegas and and how they've stretched me as a professional.  However, when my former company contacted me and asked if I'd be interested in hearing about a new position, I definitely listened.  When they offered a position-- I couldn't resist,  I didn't.   Offer letter was signed on the dotted line and the planning begun.  It's odd because as I think of going back to Colorado in the coming weeks, this entire past year in Las Vegas kind of fades into a blur and almost feels like it was just my imagination. Going back to Denver feels just more like reality.  It's hard to explain really. 

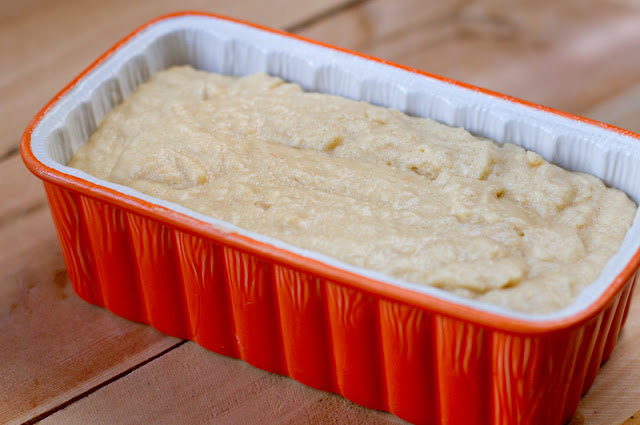
Part of moving does always involve cleaning out the pantry and fridge.  I saw a recipe for a vanilla white bean cake awhile back so decided to use up a can of beans and give it a twist and try.  One can down, 230 more cans to go. 


Coconut flour is a fun ingredient.  It has a subtle coconut flavor and a pretty phenomenal texture when used for baking.  Love using it for coconut pancakes as well. 


The ingredients in the loaf are relatively healthy.  You can leave it that way or opt for a rich chocolate glaze.  I glazed.  And then I glazed some more.

Using beans in this recipe made a loaf that was so moist that it was just as tender and moist three days later.  Not even a smidgen of dryness. Awesome. 


White Bean Coconut Loaf

1 can white beans, drained and rinsed
4 eggs
1/3 cup coconut
1 tsp coconut extract
1 tsp vanilla paste or extract
1/3 cup honey
1/2 tsp salt
1/4 cup melted coconut oil
1/3 cup coconut flour, sifted
1 tsp baking soda
1.5 tsp baking powder
  1. Preheat oven to 325 degrees. Prepare loaf pan by greasing and flouring
  2. Add beans, eggs, coconut, extracts, honey and salt to food processor bowl and puree well
  3. Add melted coconut oil, coconut flour, baking soda, baking powder to food processor and pulse to mix thoroughly, but do not over mix
  4. Bake at 325 for 45-55 minutes or until cake tester inserted into middle comes out clean
  5. Let cool 10 minutes before removing from pan and allowing to cool completely
Chocolate Ganache Glaze
6 oz semisweet chocolate
2/3 cup cream
  1. Pour cream into heavy saucepan and heat until almost boiling
  2. Turn off heat, add chocolate and whisk until all chocolate is melted
  3. Pour over cooled loaf

Wednesday, February 15, 2012

Crockpot Chicken Green Chili


There's nothing quite like coming home after a long day at the office, walking in and smelling dinner all ready to gobble up.  The only way that happens in this house obviously, is if I throw something in the crockpot.  Not sure why I don't more often because I do love, love, love food all ready to eat when I get home. And one of my favorite crockpot recipes is for a green chili.  It uses mostly canned items so is about as easy as recipes come.  I love the flavor of freshly roasted peppers, but in a pinch, the Hatch canned chilies will work as well.  

But look how lovely fresh peppers are....


This really is just about the easiest recipe out there.  After you spend about 5 minutes chopping the peppers, onions and potatoes, you throw them in the crockpot...


along with the Rotel, chicken broth, chicken breasts, garlic and cumin, and allow everything  to cook the day away.  Since I'm gone for longer than the 5-6 hours it needs to cook on high, I usually either cook it on low the whole day, or make it on a day Brooklyn doesn't go to day care and I run home at lunch to let her out.  Lunch time to dinnertime is the perfect amount of time to let the chicken cook through on high and let the flavors all meld together. 


This green chili is also pretty awesome for making a smothered burrito.  For a thicker chili for burritos,  take potato masher and roughly mash the entire stew after the chicken is removed for shredding.  Shred the chicken a bit finer and add back to the green chili mixture.  


Crockpot Chicken Green Chili

7-8 roasted poblano peppers  (or 1 28 oz cans of Hatch green chilies, drained)
4 cloves of garlic, minced
1 medium yellow onion, diced

2 large potatoes diced1 lb chicken breasts, trimmed of fat
1 28 oz can hot Rotel tomatoes
28 oz chicken broth

1/2 tsp cumin
salt and pepper to taste
cheddar cheese, sour cream and or tortillas for toppers


  1. Chop roasted green chilies and add to crockpot
  2. Add minced garlic, diced onions and potatoes
  3. Add Rotel and chicken broth. 
  4. Add chicken breasts and press down to immerse in liquid
  5. Cook on high for 5-6 hours
  6. Remove chicken breasts, let cool slightly and shred.  Return to crockpot
  7. Stir and season with salt and pepper to taste. Serve with chips, sour cream and cheddar if desired.

Sunday, February 12, 2012

Spring Mountain Ranch State Park


Spring has sprung in the high dessert so Brooklyn and I headed out to check out a state park I'd had on the list to visit.  The "adventure" had it's ups and downs but after we finally found the place, found a way to pay the entrance fee and found our way around the park, it was all worth it. 

Spring Mountain Ranch State Park is not too far out of town if you live in southwestern Las Vegas as I do.  I hopped on Blue Diamond at Buffalo and it was under 6 miles to the turnoff towards Red Rock Canyon. Once you make the turn it's only another 6 miles from there...I couldn't believe it was so close! If however, you didn't really pay attention to the directions outside of "take Blue Diamond..." you might end up staying on Blue Diamond for a good 40 minutes, passing through the Spring Mountains and finding yourself on the open highway heading who knows where and without cellular coverage before you realize that something is rotten in the state of Denmark.  After I turned around, it was a bit embarrassing to see that I should have turned towards Red Rock Canyon right outside of town.  

Lesson number 1: figure out where you are going before you embark.

Once I did find the state park, I pulled up to the entrance only to realize that it was a "self-service pay station" i.e. put money in an envelope and drop it in a hollowed out 2x4.  This as you can imagine requires cash or check and a writing utensil.  Seriously? The one thing I have learned about Nevada is that the state believes communication is overrated.  They will construct a freeway entrance and place a sign about 1 foot in diameter a few yards before the entrance to let you know this is your new freeway entrance, they'll shut down a major freeway entrance without any detour signs directing you as to how to actually get on the freeway now, and they'll detour entire 4 lanes off a highway onto a side road without signs telling you what to do next.  Not making it crystal clear that you'd need cash and a writing utensil to visit this park should not have surprised me. Luckily there was a little town with an ATM just a mile back down the road.  They also let me borrow a pen.  

Lesson number 2: the boy scouts have it right...always be prepared.  Cash is good.  Pen in the car is probably essential. 

Once we did get there though, it was such a lovely area.  If you head up to the super cute red house, they'll point you in the direction of the different walking trails. 


There was also a cow on property which may not seem that exciting unless you are a city dog.  Then, you're not quite sure what to make of it all...


Down the Ash Loop Trail. 


And then if you head in the opposite direction of the Ash Loop Trail, you come across a turquoise colored lake.  It's just a short jaunt around but there are trails that branch off throughout the park. 


After our little hike, someone came home and passed out immediately at the top of the stairs in the most dramatic fashion possible.  

Lesson # 3: A dog that can outrun me on runs can surely outlast me on a trail.  Never fall for puppy drama, it's a ploy for treats.  


Saturday, February 11, 2012

Sausage and Kale Soup


I'm on a pantry purging cleaning kick now and truthfully, I'm finding it's kind of fun to let your ingredients dictate what you make.  I have tons of beans for some reason unknown even to me, a freezer with countless packages of these all natural chicken sausages I bought when they were BOGO and a refrigerator full of kale and spinach because I've been loving on a green breakfast smoothie every morning.  With those ingredients in abundance, making a sausage and kale soup was kind of a given. 

I really love using dried beans...it's the whole "I wish I was Laura Ingalls" thing.  All you really need to make these white beans is an hour of soaking in boiling water and then an hour to cook.  This is perfect  since in my mind, soup is something you kind of throw together and let sit on the stove for hours anyway.


I believe kielbasa is the more traditional sausage used for this soup, or you could leave out the sausage altogether.


The kale looks ginormous but just like spinach, it shrinks down to almost nothing when cooked. 


And what's soup without some freshly baked rolls?  


This is a fabulous super hearty soup to make when the weather is a bit chilly.  And it's also a fabulous super hearty soup to make even if you live in the desert where the weather is not quite so chilly anymore.  The added bonus is kale and white beans make it a pretty nutritious little bowl of goodness.

The sausage floats in the soup but if you want to cook this for an additional 30 minutes, this becomes more stew like and the sausage mixes into the thickened soup.


White Bean Soup with Sausage and Kale
adapted from Epicurious
Makes one big 'ole pot of soup

1lb. dried white navy beans
2 med onions, diced
Olive oil
5 garlic cloves, minced
12 cups chicken broth
1 t black pepper
2 bay leaf
1 t crushed red pepper flakes
1/2 teaspoon rosemary, finely chopped
1 pkg chicken sausage cut into 1/4 inch slices
6 carrots, diced
1 large bunch kale (about 12 oz) washed, stems and center ribs discarded and leaves chopped
1-2 tsp salt (to taste and depending upon saltiness of broth used)
Additional pepper to taste

  1. Rinse beans, then cover with a few inches of water in a large soup pot
  2. Bring to a boil for 2 minutes and then turn the heat off, cover and let sit/soak for one hour. 
  3. Drain beans in colander and rinse well
  4. Sauté onions in olive oil in same soup pot med-low heat until translucent, 5 minutes. 
  5. Add garlic for another minute or two. 
  6. Add beans, broth, bay leaves,  pepper, crushed red pepper and rosemary. Simmer, half-covered, for 50 minutes or until beans are tender.
  7. When beans are almost tender, brown sausage over medium heat in a heavy skillet.
  8. Add sausage, diced carrots and kale  and simmer another 15 minutes or until kale is done.
  9. Season with salt and pepper

Tuesday, February 7, 2012

Squash Hummus


I always love, love hummus when I order it out.  I like it at home as well but it always seemed different at home...until I finally pinpointed what the difference was. When I order hummus out, it is served warm with fresh hot pita and when I have it at home, I usually just grab it straight from the fridge along with some veggies.  Heating up the hummus and serving it with some fresh warm pita takes this simple dip from daytime snack to schmancey feeling appetizer.  Really.

Throwing in some roasted kabocha squash results in a sweeter hummus.  If roasting a squash seems like something better done on another day but you are still craving hummus, you can throw in a cup of canned pumpkin instead.  And the best part is that hummus is so customizable to personal taste.  I happen to love tahini but if it is not your thing, you can reduce the amount to half a cup.  If you love roasted garlic, you can roast a whole head along with the squash and toss that into the food processor.  You might want to leave out the 3 garlic cloves in the recipe then...or maybe not.  Can there really be too much garlic in hummus?


Squash Hummus

2 cups of cubed baked squash (I used kabocha)
1 can garbanzo beans
3/4 cup of tahini (sesame seed paste)
3 tablespoons of extra virgin olive oil plus additional for drizzling over squash
3 cloves of garlic
The juice from half of a lemon
1/4 tsp cumin
1/4 tsp paprika plus more for sprinkling on top if desired
salt and pepper to taste

Preheat oven to 375
Cut squash into pieces and roast until fork tender.  Time will depend on size of slices and type of squash.  My kabocha took about 30 mins. 
Throw all the ingredients into a food processor or blender and pulse until smooth and creamy.
Heat in microwave in 15 second increments until heated through and serve with warm pita or naan