Friday, September 30, 2011

Pumpkin and Sausage Ravioli


Sage infused brown butter and squash or pumpkin is one of those perfect flavor combos...right up there with sea salt and caramel and chocolate.  Since it is pumpkin frenzy time, let's get started. 

Did you know that sometimes sausage comes fully cooked?  My sausage naivety shows here.  Fully cooked sausage does not crumble while it cooks so I just chopped it up fine before returning to the pan.


My pasta rolling skills aren't the hottest apparently but I just saved up all these excess scraps, cut them into mini noodles and let dry a bit.  It's almost chicken noodle soup time and I think think/hope they'll be perfect in that.


Yep, A LOT of work.  For an easier version(minus the sage brown butter), you could also slice the sausage, brown it up and then add the garlic, pumpkin, ricotta, herbs and spices. Add broth or milk to thin it out a bit and toss with penne or any other boxed pasta cooked al dente. Same pumpkin and sausage flavors and only 1/10th of the effort. 


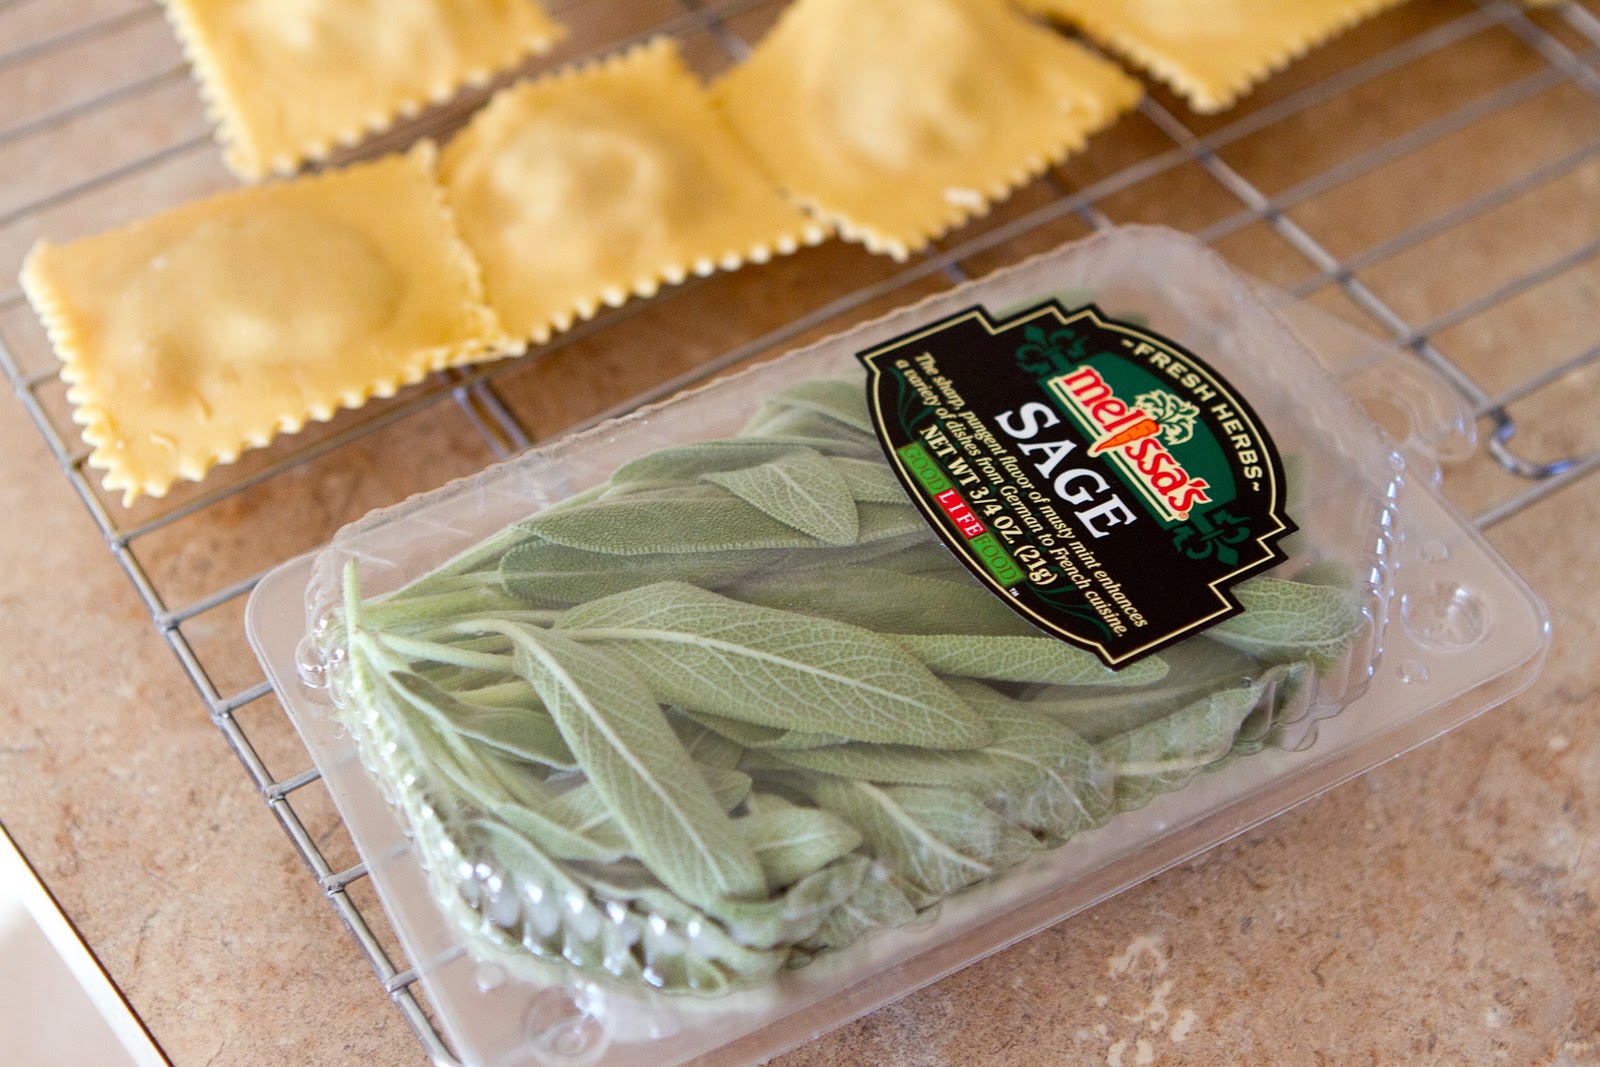
Missing my mom's chest high, 4 foot wide sage bush.  My sad sage options now.


All the leftover scraps ready for chicken noodle soup sometime soon. Once they were dry enough to not stick together, they went into a baggie in the freezer. 


I took pictures of the brown butter as well, but then deleted them all and reformatted my CF card so every single one is gone.  To make brown butter, you just melt a stick of butter over med-high heat and then let it sizzle away as the fat cooks out all of the water in the butter.  Watch carefully because it tends to go from regular butter to brown butter relatively quickly.  When the butter is a dark amber shade, throw in 10-15 leaves of clean dry sage and let them sizzle.  Serve ravioli with a brown butter drizzle and don't forget the crispy sage...it's the best part in my opinion. 


FRESH PASTA

3 cups all-purpose flour
4 large eggs
1 teaspoon salt
4 tablespoons water

  1. Mound flour on a work surface, preferably wooden, and make a well in center. 
  2. Add eggs, salt, and water to well. With a fork, gently beat eggs and water until combined. 
  3. Gradually stir in enough flour to form a paste, pulling in flour closest to egg mixture and being careful not to make an opening in outer wall of well. 
  4. Knead remaining flour into mixture with your hands to form a dough, adding more water, drop by drop, if dough is too dry (dough should be firm and not sticky). 
  5. Knead dough until smooth and elastic, 8 to 10 minutes(I throw in the KitchenAid at this point with the dough hook because I don't enjoy kneading.  
  6. Leave in mixer bowl and cover with a plate. Let rest for an hour. 


PUMPKIN AND SAUSAGE FILLING

1/2 lb chicken sausage(removed from casing)
1 cup canned pumpkin
2/3 cup ricotta
1 garlic clove, minced
1 tbsp chopped sage
a couple of grates of fresh nutmeg
salt and pepper 

  1. In medium skillet over medium high heat, brown sausage taking care to cook through
  2. Add garlic and cook additional minute
  3. Add pumpkin and ricotta and heat through.  Season with nutmeg, salt and pepper
  4. Remove from heat and set aside while you roll out pasta


Thursday, September 29, 2011

Pumpkin Sea Salt Caramel Sauce and Pumpkin Oatmeal Cookies


This is a twist on the pumpkin sea salt caramels from last Sunday's Pumpkin Sea Salt Caramels.  I saw a comment somewhere that that someone wished the caramels weren't so difficult to make.  I don't think they are so much difficult as time consuming and precise, but I know candy making isn't for everyone.  I only give it a go a few times a year because it is a little bit of an effort.  But oh the flavors of the sweet and salty pumpkin...I hate for anyone to miss out so gave it a try as a caramel sauce.  The caramel sauce is so much more forgiving since the final cooking stage doesn't require checking temperatures.  

I opted to top pumpkin oatmeal cookies with the sauce because I really just wanted to try this pumpkin oatmeal cookie recipe as well--maybe a little pumpkin overkill if there is such a thing.  Regular oatmeal cookies or cheesecake would love some pumpkin sauce as well or swirl it into homemade ice cream with some crumbled gingersnaps before freezing.  For the easiest dessert ever, you can serve the caramel right over some store bought ice cream.


The only real candy making stage is the sugar/water/corn syrup cooking.  Add all to heavy bottom pan, turn heat to medium/med low and let sugar cook without stirring.  If you don't have a candy thermometer, you can check the sugar mixture by dropping in cold ice water.  Sugar syrup should hold together and be soft and squishy in your hands--soft ball stage.  Slowly add pumpkin cream and whisk thoroughly.  Let cook until desired consistency--whisking often.  

Let it cool, ladle it in a fabulous jar and keep or give away.  You'll obviously want to refrigerate.  Much easier than the caramels, but all of the same Pumpkin and Sea Salt Caramel goodness.


The pumpkin oatmeal cookies were good but a little too sweet for me.  I'd definitely make them again and experiment with reducing the sugar.


PUMPKIN SEA SALT CARAMEL SAUCE

1 1/2 c heavy cream
1 tsp pumpkin pie spice
1 cup canned pumpkin puree
2 cups white sugar
1/2 cup light corn syrup
1/4 cup of water
4 tbsp unsalted butter, cut in chunks
1 tsp vanilla
1 tsp sea salt
  1. In a saucepan, combine cream, pumpkin puree and spices. Warm to just before boiling and set aside.
  2. In a second heavy bottomed saucepan, combine the sugar, syrup and water. Turn heat to medium and let sugars boil until it reaches 240 degrees (the soft ball point on a candy thermometer). 
  3. Very carefully add the pumpkin cream to the sugar mixture and stir. Continue cooking on medium for 15-20 mins
  4. As soon as it reaches desired consistency, pull it off the heat and stir in the butter and vanilla. Stir vigorously so that butter is fully incorporated.  Let cool and store in jar.
PUMPKIN OATMEAL COOKIES

1 1/2 cups all purpose flour
1/2 cup oat bran
1 3/4 cups old-fashioned oats
1 teaspoon baking soda
1/2 tsp salt
2 tsp cinnamon
1 tsp pumpkin pie spice
1 sticks butter; softened
1 stick margarine
1 cup packed light brown sugar
1 cup granulated sugar
1 cup canned pumpkin
1 large egg
1 teaspoon vanilla extract
1 cup dried cranberries
1 cup cinnamon or white chocolate chips
  1.  Preheat oven to 350 degrees 
  2. Line baking sheet with a silicone mat or parchment paper or generously grease individual sized cast iron skillets
  3. Combine flour, oat bran, oats, baking soda, salt, cinnamon, pumpkin pie spice in bowl and whisk to combine and remove lumps
  4.  Beat butter, brown sugar and sugar in mixer bowl until light and fluff
  5. Add pumpkin and egg and mix well. Beat in vanilla
  6. Add flour mixture combine until all ingredients are incorporated. 
  7. Fold in white chips and dried cranberries
  8. Drop by rounded tablespoons onto prepared baking sheets or spread cookie dough into skillets
  9. Bake for 12-14 minutes or until cookies are lightly browned. Cool on baking sheets for 2 minutes; remove to wire racks to cool completely

Wednesday, September 28, 2011

Pumpkin Spice Frappuccino...with Protein


I am on a pumpkin mission...such a happy time of the year.  Just a warning that every food post within the next couple of weeks will probably be pumpkin related.  

It may not be entirely accurate to call this a frappuccino because truthfully, I've never actually purchased a frappuccino.  And I'm pretty sure a frappuccino doesn't come in right around 200 calories with 100% of your daily recommended intake of about a zillion vitamins, along with calcium and other goodies. So this is really more protein shake with a little fall goodness mixed in. 

The first ingredient is of course cold espresso.  There are quite a few posts on the web about making cold brewed coffee for iced coffee.  I tried it once but it wasn't strong enough and was missing that certain espresso flavor kick that I love.  I think it's the bite from the acidity from brewed coffee, and when I have an ulcer I'll regret it, but I for now I prefer to start with brewed espresso.   I also like espresso based drinks more than regular coffee...with an espresso base, you can add milk or almond milk and have a latte rather than an iced coffee with a bit of added cream.   A moka pot is pretty cheap option to make espresso, doesn't take up counter space and makes a nice strong espresso. 


I usually brew a pot at night and refrigerate.  Then the next morning, you can have an iced latte or throw together this quick protein shake. 

I love Spirutein protein powder.  When I first moved to Vegas I had trouble finding my favorite Spirutein flavor (Exotic Red--fruity and so yummy with frozen fruit and ice blended in) and contacted the company asking where I might find some.  Their customer service told me I could find it by calling around to all the stores in my area and asking them if they carried it. Really.  And despite this,  I still love the product--that's saying something. Vanilla is much easier to find...I've found Vanilla Spirutein at Whole Foods, Vitamin Cottage, Sunflower and just about any natural grocer I've ever been in.  It has a higher sugar content than some other protein powders out there (8-9 grams) but I'd rather have a few extra grams of sugar than drink one of those shakes that make you hate each sip.  

For a pumpkin spice shake you just grab a blender jar (or pitcher--I use a stick blender for everything) and add 1 cup milk (or nut milk), 1-2 "shots" of espresso, 1-2 cups of ice, 1 scoop of vanilla protein powder, 3 tbsp canned pumpkin puree, and 1/8 tsp of pumpkin pie spice.  You can add an additional sweetener if you like--I find the sweetener in the protein powder does the job. 


Blend  and enjoy.  It is so good you'll probably forget that it's good for you, and saving 1000 calories is just a bonus.   Just an FYI that the  pumpkin, protein powder and pie spice are just as delicious mixed into oat bran for a warmer breakfast. 


Pumpkins aren't just for eating though, they are for playing with as well.  I found these pics of my little punkin from just last year.  I can't believe this tiny little 2 lb dog in the pictures grew up to be my strapping and enormous 15 lb pup of today.  Tee-hee.  Sometimes you want them to be this small again until you remember how often you had to pull out the rug cleaner right? 


Sunday, September 25, 2011

Pumpkin Sea Salt Caramel Shortbread


I've been trying to wait patiently for cool fall weather before jumping fully into the pumpkin baking spree, but Las Vegas weather isn't cooperating. Yesterday was something like 101 degrees, which while cooler than it has been, doesn't exactly have one grabbing a fleece to walk through the fallen leaves.  The fall anticipation got the better of me today though and I put out the fall decor and grabbed the pumpkin.


I actually keep pumpkin in the house all year round for Brooklyn.  Pumpkin is apparently just as delightful to puppies as it is to humans, and it's supposedly really good for them.   I mix up some pumpkin with chopped boiled chicken and a small bit of rice (or oatmeal) and stuff her Kongs with it before sticking them in a baggie in the freezer.   Brooklyn loves having a Kong straight from the freezer and it keeps her little mind and body occupied for a good 1/2 hour. 

Yep, pumpkin ismagic.

For some reason though, I limit the pumpkin baking to just fall..as many of us do.  It's odd because pumpkin is perfect any time of the year.  Just ask Brooklyn.   I was in a salt caramel mood so thought I'd give pumpkin caramel shortbread a try. Similar to the Millionaire's Shortbread I made last Christmas, it's just missing the chocolate topping.  You could add it, or you could even top it with white chocolate. 


I know that using a candy thermometer is the preferred method for making caramels. Everytime I cook the caramel to the temp recommended for soft ball stage I find my caramels too stiff and chewy. I keep the thermometer on the pan just for an indicator of temp.  To actually check the caramel I use the ice water method....keep a bowl of ice water on the side, drop caramel into it to drop the temperature down, and roll caramel between finger and thumb to check consistency.


Or, you could skip the shortbread all together if you are just in the mood for a bit of pure salt caramel goodness.  I topped with a Hawaiian red salt because it looked festive but any salt would work.  These were outrageously delicious--exactly like what you'd expect a pumpkin caramel to taste like...pumpkin pie, spice, sweet with a hint of salty, buttery fabulousness.  The fact that they make the house smell better than any candle or air freshener could do is just an added bonus. 


Pumpkin Sea Salt Caramel Shortbread

  • CARAMEL
  • 1 1/2 cups heavy cream
  • 1 tsp pumpkin pie spice
  • 1 cup canned pumpkin puree
  • 2 cups white sugar
  • 1/2 cup light corn syrup
  • 1/4 cup of water
  • 4 tbsp unsalted butter, cut in chunks
  • 1 tsp vanilla
  • sea salt

  • CINNAMON SHORTBREAD
  • 1/2 pound unsalted butter, at room temperature
    2/3 cup sugar
    1 teaspoon pure vanilla extract
    2 cups all-purpose flour
    1/3 cup cornstarch
    1 tsp cinnamon
    1/4 teaspoon salt
  1. Preheat the oven to 350 degrees  and line 8x8 pan with parchment.
  2. In the bowl of an electric mixer fitted with a paddle attachment, mix together the butter and sugar until they are just combined. Add the vanilla. 
  3. In a medium bowl, sift together the flour and salt, then add them to the butter-and-sugar mixture. Mix on low speed until the dough starts to come together. 
  4. Press about 1/2 to 2/3 of dough into prepared pan Prick with fork.
  5. Bake for 20-25 minutes or until golden on edges.  
  6. Remove from oven and set aside. 
  7. In a saucepan, combine cream, pumpkin puree and spices. Warm to just before boiling and set aside.
  8. In a second heavy bottomed saucepan,  combine the sugar, syrup and water. Turn heat to medium and let sugars boil until it reaches 240 degrees (the soft ball point on a candy thermometer). 
  9. Very carefully add the pumpkin cream to the sugar mixture and stir.  Bring to 220-240 degrees on a on a candy thermometer. I like to keep a bowl of ice water here and begin testing caramel consistency once it reaches 210 degrees since everyone has different preferences for caramel firmness. (Continue stirring occasionally through this--it may take 30-45 minutes to come to temp).
  10. As soon as it reaches desired consistency, pull it off the heat and stir in the butter and vanilla. Stir vigorously so that butter is fully incorporated.
  11. Pour the mixture onto the shortbread. Let cool 30-40 minutes before sprinkling with salt. 
  12. Or.........skip the shortbread step completely to make pumpkin sea salt caramels.  Instead, line 8 inch square pan with parchment.  Butter parchment paper well.  Pour completed caramel (after step 10) into prepared pan.  Let cool 30-40 minutes before sprinkling with salt.  Let cool completely then use knife or kitchen shears to cut into pieces. 


      Friday, September 23, 2011

      Homemade Butterfinger Bars


      These are outrageous.  As in, I couldn't believe it was true so I had to try it, outrageous.  Candy corn.  You know the stuff--the sickeningly sweet holiday treat that tons of people must adore judging by the sheer volume that is in stores each year.  I'm pretty indifferent in the "candy corn or no candy corn?" debates that happen but when I saw this recipe, I bought a bag because you have to try right?


      I saw this on Pinterest btw, and I might just change my blog name to "Chasing all Things Pinterest," because that  about sums up my life these days.  I have recipes lined up, outfits to buy, and even a grown up Barbie Dream House to decorate with the ideas found on Pinterest.  Love it despite its ability to make me feel uncreative and completely inadequate in all areas.  That's just motivation right?  To give credit where credit is due, here's the pin linking back to the original recipe.

      So for these homemade butterfinger bars, you melt 1 lb of candy corn.  Seriously.  Who is the first person who thought that melting candy corn would be a good idea?  Melt it too long and the sugar becomes a little stiff.  I melted in 15 second bursts in the microwave and it still went from solid candy corn to melted orange goo in a blink of an eye.  Bright orange goo. Mine was a bit stiff, but I threw the 1 lb of Peanut Butter in, mixed as well as I could, and microwaved for an additional 15 seconds.


      Eventually it all stirs together and you press into an 8inch square pan lined with parchment or wax paper.  Let cool. 


      The recipe calls for dipping in chocolate bark.  I opted for real dark chocolate and there was no dipping involved, only spreading.  20 seconds to spread vs all that dipping.  And since these are homemade, don't you want them to say "homemade" and not look just like the store bought kind?  :) 

      I thought these tasted just like a Butterfinger, but truth be told, I don't think I've had a Butterfinger anytime in the last decade.  I read a review that said that while the taste was spot on, the texture was slightly off--a bit chewy and not crunchy. As it turns out, I left mine in the fridge, and maybe because I zapped the candy corn longer than I should have(or maybe not), or probably just because they were cold, these turned out pretty crispy crumbly.  Pretty crazy I tell you. Candy corn.  Really.  Who thinks of these things?!?!


      Wednesday, September 21, 2011

      Ahi Tuna Sliders


      It seems that sliders are becoming a big deal on menus these days. I'm not sure if it's the allure of miniature foods, or the ability to call a burger an appetizer and eat multiple ones that's the real appeal.  My favorite are the tuna sliders and what I do know is that making them at home is almost as easy as placing an order in a restaurant. 


      Roughly cube the ahi before pulsing in the food processor.  This ensures that the tuna evenly distributes and chops.  A couple of quick pulses should do it.  You definitely don't want to turn on the food processor and let it go to town on the tuna. 


      Add the good stuff.  You could substitute any seasonings at this point,  I'm thinking that adding cumin, green chile and garlic and salt would make some pretty phenomenal sliders as well.


      I like them with sriracha, but you could also top with lettuce, asian cucumber slaw or whatever it is you like to top your burgers with.  Easy peasy meal...I prep the tuna the night before and let it marinate all day.  When I get home from work, I start the potatoes in the oven and when they are almost done, throw the sliders on to cook.   


      Ahi Tuna Sliders

      1 lb ahi tuna steaks minced
      2 tbsp soy sauce
      1 tbsp of grated fresh ginger
      2 cloves garlic, minced
      1 green onion sliced
      slider buns
      sriracha for topping (optional)


      1. Mix the marinade ingredients together and stir into the minced tuna.  Cover and refrigerate for at least an hour.
      2. Shape into patties

      3. Heat grill pan to medium high.  Toast buns, remove and set aside.
      4. Cook slider patties in grill pan for 2-3 mins, flip, cook 2-3 mins on 2nd side. 
      5. Serve with sriracha and oven baked fries


      Monday, September 19, 2011

      Goal # 47, Ride in a Hot Air Balloon


      I really didn't intend to go for so many "big ticket" items so close to kicking off my goals list, but Groupon had other plans.  It's hard to pass up a 1/2 off balloon ride when it's on your list of things do and experience right?  


      What can I say about the experience? Well, lesson one: they don't go nearly high as they appear to be from the ground. I kind of expected all of the Las Vegas tract housing to look more ant like.  I'm pretty sure I could repel from this height.  If I knew how to repel that it is.


      Red Rock Canyon from the air


      Lesson two: it's called a hot air balloon for a reason apparently. This might be an activity better scheduled for a cool winter day because you can absolutely feel that hot, hot air each time the pilot hits the lever to shoot some fire up into the balloon. Even a 6 am September flight felt quite toasty oasty. But it is so very cool to look up and see this...


      Lesson three: wide angle lenses are not appropriate portrait lenses, and portraits should not be shot from 9 inches away.  There's not a lot of space to move around in those baskets.


      Lesson four: balloons do not go very fast.  If there is no wind, they don't move much at all.  It's more like floating up in the sky while taking in the view.  But oh the view.  Outstanding. 


      All in all, so glad to have participated.  I think I expected more of a rush  like skydiving would bring, but it's really just a chillaxing, super mellow time.  No blood pressure rising.  No adrenaline released.  Not even a tiny bit scary(if you are not afraid of heights). And when we landed in the desert field, we had a fruit and mimosa treat awaiting us.  Not too shabby at all.