Saturday, August 31, 2013

Banana Bread French Toast


A holiday weekend deserves french toast don't you think?  After having turned all of the no knead bread from a former post into french toast, I had to look elsewhere in the kitchen for inspiration. 

This is what I found. 


If you are a family, you may not have any leftover banana bread sitting around.  If you are single like me, maybe you will.   I bake a loaf of anything and I have to take it to the office or else it sits and sits and sits.  I have two half loaves of moldy pumpkin bread I just found in the fridge.  

So yes, one loaf of banana bread, fresh and delicious on day one, quickly became 3 day old forgotten banana bread.  


I do like to turn day/s old goodies into french toast.  As I said in my glazed donut french toast post....you're just adding eggs and milk so really making it healthy right?  He-he.


Can you really write a recipe for french toast?  I use 2 eggs, 1 cup of milk, 1 tsp cinnamon and 1 tsp vanilla  whisked together.  Sometimes if I want to mix it up, I use almond extract instead.  Dip the sliced bread, and add to med-high griddle.  Cook until golden and flip--about 3-4 minutes per side.  Top with maple syrup.  Of course.

Happy and safe Labor Day weekend wishes!

Friday, August 23, 2013

Homemade Tortillas


I've had a life-altering experience, a surprise realization, a food epiphany really.  

The homemade tortilla. 

Yes, this simple little culinary treat that takes mere minutes to make is seriously a happy hello in my life.  Who knew that in mere minutes, you can replace those rubbery cardboard corn tortillas with homemade  ones?  These fresh ones are not even a distant relative of what you buy at the grocery store.  


I'd watched  tortillas being made on Food Network.  You'll always lose me the minute the word lard is thrown out.  Sadly I didn't realize that flour and corn tortillas were completely two different beasts when it came to ingredients. 

There is no lard in corn tortillas.  Nada.  Zip. Zilch.  The ingredient list is as simple as masa (not to be confused with cornmeal), salt and water and the preparation is as easy as mix, roll, press, cook. I had fresh homemade tortillas in less than 10 minutes. 

You can buy a tortilla press and I did because I was told they are absolutely essential.  Truthfully though, I got the same exact result by placing a large baking sheet over the plastic and dough and placing all my weight on it.  If you envision making these often, it might be worth the kitchen space.  If not, the baking sheet got them just as thin. 


Homemade tortillas have a subtle corn flavor, almost reminiscent of fresh tamales and they are soft and rather than rubbery.   I especially love them with fresh grilled fish tacos, but when I finished up the mahi mahi, I tried them with a chipotle beef barbacoa.  Not too shabby either.  All that just to say homemade tortillas are awesome and definitely worth a try.  They are so ridiculously easy and delish, that you may find yourself trying to make taco filling out of everything like I did. 

Chipotle Beef Barbacoa can be found here.


Homemade Tortillas

Ingredients:
2 cups Masa Harina
1+ cup warm water
1 teaspoon salt

Directions:
  1. Dissolve salt in warm water.  
  2. Measure out masa into a medium bowl. Pour warm water into masa, stirring and kneading until dough comes together. Dough should be soft but not sticky. 
  3. Preheat griddle or pan to medium heat.
  4. Toll dough into golf size balls Place between two pieces of parchment paper or half gallon size baggie split up the sides, and flatten out with tortillas press. 
  5. Cook for 1-3 minutes on each side. Cover done tortillas with a damp towel and place in oven, or place in a tortilla warmer to keep warm. 

Sunday, August 18, 2013

Chocolate Coconut Cream Pie


For some reason, the thought of making pies seems like so much work.  This particular recipe has a few steps and a bit of waiting and cooling between crust prep and filling layers. This is definitely not a recipe you can throw together at the last minute--it took about 4 hours end-to-end.  Don't let that scare you though because each step is easy-peasy and the result is well worth it.  It has all of the creaminess of coconut cream pie but with the added fabulousness that is chocolate ganache. 

Chocolate ganache belongs in everything.  The End. 


Seriously, sometimes I just can't handle all of the cuteness radiating from this one.  


Chocolate Coconut Cream Pie

Ingredients

Crust:
1 pkg chocolate wafer cookies, broken into pieces
1/4 teaspoon coarse salt
5 tablespoons unsalted butter, melted and cooled

Chocolate Ganache:
6 oz semisweet chocolate, finely chopped
2 tablespoons unsalted butter (1/2 stick), cut into small pieces
1/3 cup heavy cream
pinch of salt

Coconut Cream:
1 1/2 cups sweetened shredded coconut
2 3/4 cups milk (I used whole milk)
4 large egg yolks
2/3 cup sugar
1/3 cup cornstarch
1 tsp vanilla extract
Topping:
1 1/2 cups heavy cream
Chocolate syrup for drizzling

Directions:
  1. Preheat oven to 325 degrees. 
  2. In a food processor, combine cookies and salt; process until fine crumbs form. 
  3. With machine running, slowly pour butter through feed tube and process until mixture resembles wet sand. 
  4. Press crumbs in bottom and up side of a 9-inch deep-dish pie plate. Bake until crust is set, about 20 minutes. Remove and let cool completely
  5. Combine ganache ingredients in a small saucepan over med-low heat and whisk until chocolate begins to melt.  Remove from heat and continue whisking until chocolate is fully melted.  Pour into cooled pie shell, spread up the sides of the crust a bit and then refrigerate for 1 hour. 
  6. In a medium heavy bottom saucepan, whisk together egg yolks, milk, sugar, cornstarch, vanilla, and salt over medium heat. While whisking constantly, cook until bubbles form at the edge and mixture thickens, about 5 minutes.  Stir in coconut. 
  7. Pour filling into cooled crust and smooth top. Lay plastic wrap over filling to prevent skin from forming and refrigerate until filling is chilled and completely set, about 2-3 hours.
  8. To serve, whip cream until soft peaks form. Top pie with whipped cream and drizzled chocolate syrup.  Chocolate shavings and/or toasted coconut would also be fantastic. 

Wednesday, August 14, 2013

Colorado Renaissance Festival


Two things.  ONE: Peanut isn't quite the little Peanut anymore.  The consolation there is she's developing quite the young girl personality.   TWO: Peanut, and my entire family to be precise, are relocating to Las Vegas in the coming weeks.  Seriously.  I move back to Denver from Vegas and they all abandon me for Sin City.   I say that jokingly of course.  It'll be awesome for my sister to get some family time, and for Peanut and Chipmunk to see each other more often than just Christmas.  

Part of the departure planning though was ensuring I got lots and lots of Peanut & Auntie time.   When I was debating on activities, Renaissance Festival immediately came to mind because how cool are flower crowns and dressing up in costume when you are 6?  

I debated on picking out her costume because I've learned that 4, 5 and 6 year olds are a little particular about so many things. I thought the princess dresses would be a hit but too hot.  I finally settled on a garden fairy costume and luckily, she was thrilled.....whew.  Update:  To answer a few e-mail questions on the dress--I purchased it here.  


She had the pick of the festival, as any good garden fairy should, and this fairy chose a matching flower crown made with dried real flowers over over the rows and rows of artificial pinks and purples.  Aye, she's really growing up. 


The bungee trampoline was always my favorite part of the festival....I think it was hit with her too. 


And of course festival food is the best.  Forget turkey legs, it was frozen yogurt filled oranges for us.  


Something about a fairy costume screams out for an ethereal Lightroom filter.  I am going to miss this little Peanut.  Sniff, sniff. 


Saturday, August 10, 2013

No Knead Cast Iron Sourdough Bread...French Toast


This is a little bit about a french toast recipe, but more about what to do with all of that leftover no-knead cast iron bread you'll probably be making after the weather slowly moves from hot cruel summer to cool cozy fall.   Yes?  Yes. 

Hopefully you've had a chance to make some of the basic no frills no-knead bread..there's nothing like pulling a loaf of freshly made artisan type bread out of the oven, and it's even better if it only took a few minutes to throw together.  If you have made it though, you know that this is usually "same day only" bread.  No preservatives means this bread is awesome the day it's baked and quickly (too quickly) loses it's charm as time progresses.  You can make some pretty great croutons and bread crumbs with a day old loaf, but my favorite use is french toast.  Of course. 


First the bread of course, and since I can't post the same recipe repeatedly, I tried a sourdough version this time.  

My starter is about 3 months only and only gets better over time.  I poked some holes through a plastic cap, and store my starter in the fridge. Every couple of weeks I dump the starter into a clean quart sized mason jar because the dried crusty starter towards the top of the jar starts to bug me.  Keep feeding this and the starter will become your friend for use in bread, muffins and ... yum ... pancakes! 


This is a perfect weekend recipe in my mind because if you make the dough Friday night before bed, you can have fresh bread on Saturday (I used to give in and buy that $7 artisan loaf every week at the farmer's market) and then have leftover bread for french toast for Sunday brunch.  

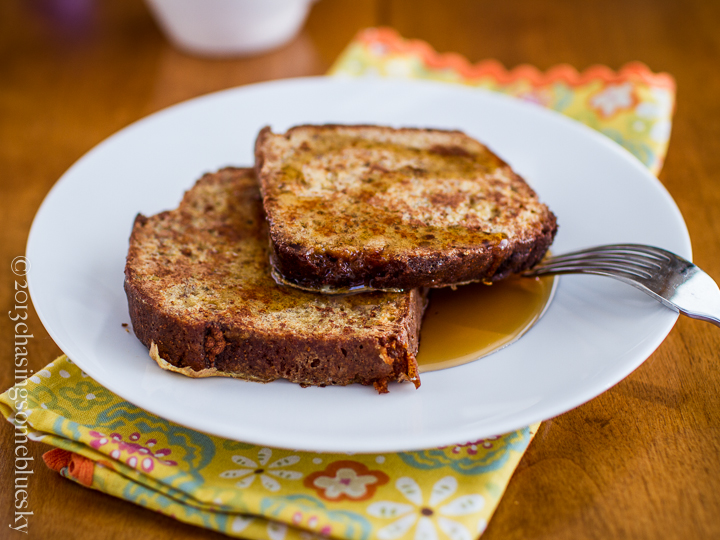
French toast...does it need a recipe? I use 2 eggs, 1 cup of milk, 1 tsp cinnamon and 1 tsp vanilla  whisked together (I don't soak the bread for long but if you do, you'll need much more egg/milk mixture), dip the sliced bread, and add to med-high griddle.  Cook until golden and flip--about 3-4 minutes per side.  Top with maple syrup or freshly made blueberry syrup. 


And it goes without saying that this is best served with a nice latte.  Have you tried a Nespresso sample at your local Williams Sonoma or Crate and Barrel?  One latte and I was absolutely sold and this machine came home with me two years ago.  I love him.  Madly, deeply and truly.  

The associate at C&B talked me into the Citiz version with the attached milk frothing unit.  I'd originally wanted the decoupled version so I could store the milk frother in the cupboard but she showed me how the frother shelf could also be used to store espresso cups and the pods in a cute little apothecary jar... oooohhhhh..... so cute....


When it comes to my java though, cute is not going to cut it.  This machine makes a pretty good espresso (said the girl who drank 10-12 a day in Italy). It's not as good as the $2000 espresso maker Williams Sonoma tried to sell me (yeah, nice try) and it's better than a stove top moka pot.  The pods make it as quick and mess free to make a latte as it is to make a cup of Keurig coffee and the pods are similarly priced if you use one pod.  I like my lattes strong so use 2-3 pods depending upon cup size-- 1 pod makes one espresso shot.  The biggest bummer is the exclusivity of the Nespresso pod system...unless you are near a Nespresso store, you have to buy them from Nespresso online.  You definitely have to watch your stash and plan ahead because if you run out, well you are waiting for delivery.  They are little painful on the wallet when you are ordering 200 at a time but I just consider it an investment in my sanity.  Much cheaper than therapy.

Seriously good stuff comes out of this machine.  I like the espresso as much as the lattes--look at the crema on this beauty!  If you love your java and don't mind a little investment for it, this thing is awesome.  Can you tell I love it?


No Knead Cast Iron Sourdough Bread


Sourdough Starter

2 cups all-purpose flour
2 teaspoons granulated sugar
1 packet or 2 1/4 teaspoons of active-dry yeast
2 cups warm water
  1. Mix the flour, sugar, and yeast together in a clean and sterile container (use only glass, glazed ceramic or crockery to hold your starter. No metal or plastic) that can hold two quarts. Gradually stir in the water and mix until it forms a thick paste (don't worry about any lumps, as they will disappear).
  2. Cover the container with a dish cloth and let it sit in a warm counter. The dish cloth will let wild yeasts pass through into the batter. The mixture should bubble as it ferments (this will foam up quite a bit). 
  3. Let it sit at room temperature for 2 to 5 days, stirring it once a day with a wooden spoon. The starter is ready when it develops a pleasant sour smell and looks bubbly.
  4. Once your starter starts bubbling, then start feeding it daily with flour and water according to the directions below. Then stir it, cover loosely and allow a little breathing (can use plastic wrap with a hole punched in) and store it on your counter top or in the refrigerator.  Never store in an airtight container. 
  5. If stored on the counter, you'll need to feed it every 1-2 days which is great if you use it often.  If stored in the fridge you'll want to either use some once every 2 weeks, or dump some out and feed. 
To Feed:
Remove approximately 3/4 to 1 cup of starter (use this starter in a baked item or throw it away). Replace it with same amount (3/4 to 1 cup) of warm water plus(3/4 to 1 cup) flour.  Stir with wooden spoon and store

No Knead Sourdough Bread

Ingredients
1 cup sourdough starter at room temp
3 1/4 cups flour
2 teaspoons sea salt
1 cup water
1/2 tsp yeast (not always needed with sourdough starter, but I still like to add a bit)

Instructions
  1. Pour sourdough starter into a bowl with flour, salt, yeast and water. Mix with wooden spoon until combined. 
  2. Cover bowl with plastic wrap and set aside for 12-16 hours or overnight.
  3. Heat oven to 450 degrees. When the oven has reached 450 degrees place a cast iron pot with a lid in the oven and heat the pot for 25 minutes. 
  4. While the oven and pan is preheating, dump dough onto a heavily floured surface and shape into a ball. Cover with plastic wrap and let rest until pan is ready.
  5. Remove hot pan from the oven and carefully drop dough into ungreased pan. 
  6. Cover and return to oven for 30 minutes. 
  7. After 30 minutes remove the lid and bake an additional 10-15 minutes or until golden brown. 
  8. Remove bread from oven and place on a cooling rack.  Let cool before slicing