Thursday, October 24, 2013

Game Day Jalapeño Popper Dip


I'm still in denial about Sunday night's game.  Broncos lost, blah, blah, blah.  While Denver made a pretty awful showing, game day eats are still necessary.  

This recipe is all over the internet.  And Pinterest.  So I give credit to every single person who's ever posted it because in my aversion to mayo, I sought out other creamy alternatives and combined multiple versions.  It's really kind of difficult recipe to screw up....bacon, cream cheese, cheddar...it's all good. 


I used 3 jalapeños and the seeds from one pepper and it definitely had a bit of smackdown spiciness to it.  This is coming from a girl who grew up on Thai food.  If you think spicy is awesome though, (which it is) then definitely throw those seeds in. 

Make sure you dice the jalapenos finely, almost to a  mince so they cook all the way through.  I'd even cut mine a bit smaller next time. 


Bubbly, cheese baked goodness is the best way to bring on game day.  And true to the jalapeno popper campfire pie iron post from earlier this summer, I think a bit of raspberry jam cuts the fire just perfectly. I  happen to love sweet, savory and spicy combinations but this tastes just as fantastic without. 


Game Day Jalapeño Popper Dip

2 packages of cream cheese (8 oz each) softened
1/2 cup mayo
1/2 cup sour cream
5-6 pieces of bacon cooked crisp and crumbled
2-3 jalapeños finely diced (with seeds if you want it extra super duper spicy)
2 green onion stalks, sliced thinly
1 cup shredded cheddar cheese
1/3 cup shredded parmesan

TOPPING ingredients:
1 1/2 cup crushed ritz crackers
1/2 cup parmesan cheese
1/2 stick melted butter

Directions:
  1. Pre-heat oven to 350 degrees F
  2. Combine all the top ingredients and mix together well
  3. Pour in 9x6ish sized baking dish.  
  4. In a separate bowl combine all of the topping ingredients
  5. Pour over top jalapeno mixture
  6. Bake for 20 minutes
  7. Broil for 2-3 minutes until crackers are browned a little
  8. Serve with chips or crackers. Awesome with a bit of jam to cut the fire.

Saturday, October 19, 2013

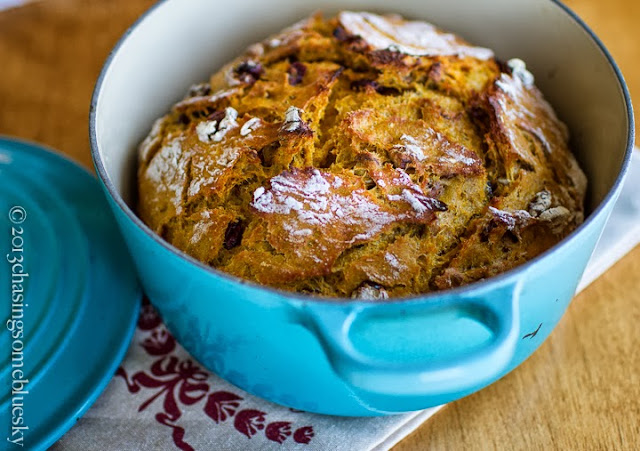
Pumpkin Pecan No-Knead Bread


I really love bread.  I feel like I need to just come right out and say that because we have another no-knead bread recipe here.  If I really love bread, then I really, really, really love no-knead bread. It's just so easy peasy, your house smells FANTASTIC and you have yummy bread to gorge on.  What's not to love really?  

I embraced the season and made a pumpkin version similar to the Guinness Cherry Pecan bread I made earlier this year.   This pumpkin bread is not remotely similar to a sweet smushy pumpkin quick bread but rather like those big crusty loaves of raisin pecan artisan loaves you find in the bakery.  It's pretty fantastic fresh but even better toasted up with some cinnamony fruit butter.  It's definitely a perfect snack after an early morning walk through fall colors. 

Behold, Pike's Peak.  See it?  That snowy peak way, way, way back there?  I bought a new guide book and saw that a photo of this open space that had phenomenal view of Pikes Peak.  

I checked the book again after the walk....they tricked us by using a telephoto lens.   Still a lovely walk anyway. 


This particular walk was a little experiment to see if Brooklyn could potentially be normal around big dogs.  Since the attack, my formerly angelic and ultra-submissive dog goes into full-on Cujo mode anytime she sees a big dog.   Her behavior is so over-the-top that strangers take to crossing the street rather than passing us on the sidewalk.  The other day a woman with a German Shepherd left the path and crossed a field in order to avoid my crazy snarling dog with her dripping gnashing teeth.  Yeah, I see a few puppy PTSD sessions  in our future.

I was hoping that maybe an easy way to re-introduce her to big dogs would be to meet up with a big dog she already knew.  We went ultra-big in this case...go big or go home right?


Can you find the peek-a-boo Boston in this picture?  Love that face. 


Yeah. Turns out she's just fine with her BFF.  


Being crazy is exhausting.


So the pumpkin bread.  You know a recipe will be A-OK when it starts out like this.  


Same overnight process as the other no-knead breads.  I love how bubbly and yeasty and yummy it looks and smells in the morning.


I baked this in my 4.5 quart cast iron pan and found it required a bit more baking time.  This recipe is slightly bigger than the other ones so recommend using a 5.5 quart pan if you have one.  The recipe below assumes you do...if using a smaller one, you'll want to cook for at least an additional 10-15  minutes covered.  Bread is done when it sounds hollow when you knock on it.  And of course, bread  is delicious when you eat it.  Enjoy!


Pumpkin Pecan No-Knead Bread

1/2 cup chopped pecans
1/2 cup dried cranberries
1 cup water
1 tbsp yeast
1 15-oz can pumpkin puree
1/4 cup sugar
1 tbsp cinnamon
1tsp salt
4 cups flour plus additional for working surface
  1. In a large mixing bowl, stir together pumpkin puree and water until smooth.  Add remaining ingredients except pecans and cranberries and stir well to combine. 
  2. Cover bowl with plastic wrap or plate and set aside for 12-18 hours or overnight. 
  3. Heat oven to 450 degrees. 
  4. Heat pecans in skillet over medium high heat, shaking pan often to prevent burning.   Remove from heat when pecans are lightly toasted.  Set aside. 
  5. When the oven has reached 450 degrees place a 5.5 quart cast iron pot with a lid in the oven and heat the pot for 25 minutes. 
  6. While the oven and pan is preheating, add cranberries and pecans to dough and stir well. 
  7. Dump dough onto a heavily floured surface and shape into a ball. Let rest until pan is ready.
  8. Remove hot pan from the oven and carefully drop dough into ungreased pan. 
  9. Cover and return to oven for 30 minutes. 
  10. After 30 minutes remove the lid and bake an additional 10-15 minutes or until golden brown. 
  11. Remove bread from oven and place on a cooling rack. Let cool before slicing

Friday, October 4, 2013

Abandoned Mines


Cool things to do in Colorado: visit abandoned mines.  Mining and the Gold Rush are a huge part of Colorado's history and it's pretty obvious any time you drive through the mountains.  Any substantial drive almost guarantees a roadside view of an abandoned mine shaft, watermill or mining ghost town.  

I do l prefer photographing the old, ancient and decrepit over the new, sparkling and shining so when given the opportunity to visit a private abandoned mine, I signed up immediately.  You don't often have the opportunity to get up close and personal.  

Obviously these photos were taken a bit earlier in the year--we finally have our golden aspens that that I'd sought out two weekends ago in Vail.  I can sometimes post older pictures as I find them because I'm random like that.  And because sometimes I read fellow Colorado bloggers and am inspired by where they've visited and cool places they've found and think how nice it is that they've shared. 

Victor is one of those great finds.  While this old mine is on private property and only open for tours on occasion, there is a mining museum in Victor that has some great photography opportunities.  I saw some that some of my trip mates took and thought "Oh man--why didn't I see that?" I think Victor has some other mining tours available as well but they may be more modern mines.  Regardless, it's a quant little town with a corner soda fountain shop and a beautiful drive from Colorado Springs.  Definitely worth the trip if only for the breathtaking Rocky Mtn scenery. 


Wednesday, October 2, 2013

Ranch Turkey Meatball Subs


Luckily football season extends over 16 regular season games minimally which gives us all the opportunity to cook our way through 16 weeks of game day eats.  Who doesn't love game day eats right?

Yes, it's all about the Denver crockpot again because this is Broncos Country after all. Meatballs are perfect crockpot food because the longer you leave them in there, the better they seem to get. 

I think homemade marinara is such an easy thing to make.  The mess however is atrocious so I always make a mega "use Sams Club sized #10 cans" batch when I do.  Who wants to clean up tomato sauce spatter multiple times when you get get such a big batch done at once and just freeze it?  

First you start off with onions as many fantastic foods often do. Add garlic and basil. I sometimes split the basil so that I had some to the sautéing onions and the remaining amount after the tomatoes.  I don't know why. 


Add carrots, red wine and vinegar.  I know the balsamic may sound strange at first but I swear it's the secret ingredient.  When balsamic reduces it has a sweet tangy taste that makes the sauce.  It won't taste like vinegar, I promise.   Carrots add a natural sweetness to the sauce as well. 


Then you add the tomatoes and let it cook away.  This recipe is so simple and definitely worth the small amount of chopping it takes.  It only takes a little more prep time that opening a jar and homemade sauce is always better than jarred. 

Confession time: even the garlic was from a jar because I hate touching the stuff.  I know that puts me into the weird cook category because every time I watch Food Network, they all have such a time chopping garlic. They pick it up with their hands and just that act sends me into a bit of a shudder..  No matter what I do, I can't get the smell of garlic off my hands well enough for my bloodhound nose not to fixate on it.  I think jarred garlic  tastes like the preservative solution it's stored in, but freeze dried garlic?  Genius and absolutely no after taste. It's a slightly larger mince but perfect for recipes like this where it's going to be further pureed with the sauce.  There's also a frozen garlic you can buy in little individual servings.  I've done a lot of garlic research in my efforts to avoid touching it. 


The meatballs are pretty straight forward except for the Ranch dressing packet. I add it because as we know, turkey can taste boring.  The ranch gives them a little pop of flavor but doesn't taste distinctively like ranch.  I know because I don't generally like ranch.  

I opt to broil them to avoid the mess of browning but as we all know, browning in a frying pan on the stovetop is pretty delish too.  This recipe makes a little less than 2 full size trays of meatballs depending on size. I made 45 total. 


I made meatball subs for game day but made a batch for an office potluck as well.  Meatballs make a pretty awesome slider as well and throwing some of the frozen Rhodes dinner rolls in the oven is perfect for making slider sized buns.  Plus people ask you if you baked.  Technically you did. 


These are pretty fantastic made the day before the big game and then reheated in the crockpot on game day. And while they are perfect served up Broncos style, I'm guessing they would taste pretty bad if served while watching the Raiders or Chiefs.  Or Chargers. Or Steelers.  Or Patriots.   In fact I'm sure they would. 


Serve on rolls with freshly sliced mozzarella and enjoy while watching a little Mile High Magic. 


Ranch Turkey Meatball Subs

Marinara:
3 tbsp olive oil
1 large onion, diced
4-5 cloves crushed garlic
2/3 cup roughly chopped carrots
1 cup balsamic vinegar
1 cup red wine
1 #10 size can crushed tomatoes or equivalent (about 96 ounces)
1/2 cup fresh chopped basil, or 2-3 tbsp dried basil
salt and pepper to taste

Meatballs:
4 lbs ground turkey
1 pkg dry ranch dressing mix
3 garlic cloves finely minced
1/2 cup milk
1 c bread crumbs
3 eggs
1/2 cup grated parmesan
1 tsp pepper
1-2 tbsp basil

For serving:
Rolls
mozzarella

Directions:
  1. Prepare sauce: add olive oil to a large 8-10 quart stockpot and heat over medium heat.  Add diced onions and cook until slightly soft and translucent, about 4-5 minutes
  2. Add garlic, basil and cook for 1-2 minutes taking care not to let garlic brown.
  3. Turn heat to high and add carrots, vinegar and wine. Allow liquid to reduce by 1/2. 
  4. Add crushed tomatoes, reduce heat to medium low, top with lid and cook sauce for 45 minutes.  
  5. Use stick blender to puree sauce.  Turn heat to low, return lid and allow to simmer while you prepare meatballs. 
  6. Preheat oven on broil and place rack on second slot down from broiler.
  7. Add all meatball ingredients to large mixing bowl, and gently mix well enough to combine ingredients but taking care not to overmix meat. 
  8. Shape meatballs into 1 inch meatballs and place on lightly greased baking sheet.  Broil until brown on top and flip to brown other side (was about 4 minutes per side in my oven)
  9. Remove from oven and transfer meatballs to marinara.  
  10. Simmer for 2-3 hours on low.  Serve with rolls and mozzarella.