Showing posts with label Cooking-random. Show all posts

Wednesday, October 2, 2013

Ranch Turkey Meatball Subs


Luckily football season extends over 16 regular season games minimally which gives us all the opportunity to cook our way through 16 weeks of game day eats.  Who doesn't love game day eats right?

Yes, it's all about the Denver crockpot again because this is Broncos Country after all. Meatballs are perfect crockpot food because the longer you leave them in there, the better they seem to get. 

I think homemade marinara is such an easy thing to make.  The mess however is atrocious so I always make a mega "use Sams Club sized #10 cans" batch when I do.  Who wants to clean up tomato sauce spatter multiple times when you get get such a big batch done at once and just freeze it?  

First you start off with onions as many fantastic foods often do. Add garlic and basil. I sometimes split the basil so that I had some to the sautéing onions and the remaining amount after the tomatoes.  I don't know why. 


Add carrots, red wine and vinegar.  I know the balsamic may sound strange at first but I swear it's the secret ingredient.  When balsamic reduces it has a sweet tangy taste that makes the sauce.  It won't taste like vinegar, I promise.   Carrots add a natural sweetness to the sauce as well. 


Then you add the tomatoes and let it cook away.  This recipe is so simple and definitely worth the small amount of chopping it takes.  It only takes a little more prep time that opening a jar and homemade sauce is always better than jarred. 

Confession time: even the garlic was from a jar because I hate touching the stuff.  I know that puts me into the weird cook category because every time I watch Food Network, they all have such a time chopping garlic. They pick it up with their hands and just that act sends me into a bit of a shudder..  No matter what I do, I can't get the smell of garlic off my hands well enough for my bloodhound nose not to fixate on it.  I think jarred garlic  tastes like the preservative solution it's stored in, but freeze dried garlic?  Genius and absolutely no after taste. It's a slightly larger mince but perfect for recipes like this where it's going to be further pureed with the sauce.  There's also a frozen garlic you can buy in little individual servings.  I've done a lot of garlic research in my efforts to avoid touching it. 


The meatballs are pretty straight forward except for the Ranch dressing packet. I add it because as we know, turkey can taste boring.  The ranch gives them a little pop of flavor but doesn't taste distinctively like ranch.  I know because I don't generally like ranch.  

I opt to broil them to avoid the mess of browning but as we all know, browning in a frying pan on the stovetop is pretty delish too.  This recipe makes a little less than 2 full size trays of meatballs depending on size. I made 45 total. 


I made meatball subs for game day but made a batch for an office potluck as well.  Meatballs make a pretty awesome slider as well and throwing some of the frozen Rhodes dinner rolls in the oven is perfect for making slider sized buns.  Plus people ask you if you baked.  Technically you did. 


These are pretty fantastic made the day before the big game and then reheated in the crockpot on game day. And while they are perfect served up Broncos style, I'm guessing they would taste pretty bad if served while watching the Raiders or Chiefs.  Or Chargers. Or Steelers.  Or Patriots.   In fact I'm sure they would. 


Serve on rolls with freshly sliced mozzarella and enjoy while watching a little Mile High Magic. 


Ranch Turkey Meatball Subs

Marinara:
3 tbsp olive oil
1 large onion, diced
4-5 cloves crushed garlic
2/3 cup roughly chopped carrots
1 cup balsamic vinegar
1 cup red wine
1 #10 size can crushed tomatoes or equivalent (about 96 ounces)
1/2 cup fresh chopped basil, or 2-3 tbsp dried basil
salt and pepper to taste

Meatballs:
4 lbs ground turkey
1 pkg dry ranch dressing mix
3 garlic cloves finely minced
1/2 cup milk
1 c bread crumbs
3 eggs
1/2 cup grated parmesan
1 tsp pepper
1-2 tbsp basil

For serving:
Rolls
mozzarella

Directions:
  1. Prepare sauce: add olive oil to a large 8-10 quart stockpot and heat over medium heat.  Add diced onions and cook until slightly soft and translucent, about 4-5 minutes
  2. Add garlic, basil and cook for 1-2 minutes taking care not to let garlic brown.
  3. Turn heat to high and add carrots, vinegar and wine. Allow liquid to reduce by 1/2. 
  4. Add crushed tomatoes, reduce heat to medium low, top with lid and cook sauce for 45 minutes.  
  5. Use stick blender to puree sauce.  Turn heat to low, return lid and allow to simmer while you prepare meatballs. 
  6. Preheat oven on broil and place rack on second slot down from broiler.
  7. Add all meatball ingredients to large mixing bowl, and gently mix well enough to combine ingredients but taking care not to overmix meat. 
  8. Shape meatballs into 1 inch meatballs and place on lightly greased baking sheet.  Broil until brown on top and flip to brown other side (was about 4 minutes per side in my oven)
  9. Remove from oven and transfer meatballs to marinara.  
  10. Simmer for 2-3 hours on low.  Serve with rolls and mozzarella. 

Sunday, July 28, 2013

Butternut Goat Cheese Pasta


Do you have ingredients that you buy every time you shop regardless of whether you have some at home?  I had a friend who buys avocados every time she goes to the store.  She always has piles of them in varying levels of ripeness accumulating on her counter. 

For me, it's cheese.  I counted 17 pkgs of shredded cheese (I kid you not), 5 blocks of artisan cheese, 2 wedges of parmesan, 3 full size balls of fresh mozzarella and 2 enormous logs of goat cheese when I cleaned out my fridge yesterday.  We won't count the Costco bag of string cheese--those belong to Brooklyn as she is more diligent about eating her cheese than I am. 

All that to say that I adore cheese.  It frightens me to think of a refrigerator without it.  And with so much cheese, I needed to make cheese with a little pasta today. 

This "recipe" was quite the evolution.  It started with an idea to make a goat cheese mac-n-cheese type dish. While searching for mac in the basement "pantry" I realized that 1) I didn't have macaroni and 2) I still had a butternut squash from last fall.  Seriously.  I store them in the cool basement and while they last months, I was surprised that this one lasted months and then some.  So then I wanted to make something with butternut squash. Butternut squash and creamy goat cheese is definitely good eats. 


The evolution didn't stop there.  True to most of my cooking, it's all often about what' closest or what whim hits me....

....I was going to sautee the onions in coconut oil but then I found bacon in my fridge....bacon it is.
....I was going to make the sauce with white wine...for all of a second.  Then I saw the beer that I'd just opened, sipped, and decided I wasn't in the mood for.  When you are cooking just for yourself, you can use the beer you just sipped.


Beer is definitely not standard or expected but I was thrilled with the result.  Seriously.  Beer has that malty, hoppy flavor that translated into a hearty sauce that was fantastic with the goat cheese.


A full pantry search yielded exactly one pkg of pasta.  The luck continues.


I'm not the world's biggest pasta eater but this was a combo that I loved, loved, loved.  It might even persuade me to eat pasta twice in the same week.  The sweet butternut squash was a perfect contrast to the salty bacon, tangy goat cheese and malty beer.  I love a happy accident.


Butternut Goat Cheese Pasta

Ingredients:
8 oz dried pasta
4 oz bacon diced
1 cup diced onions
2 garlic cloves minced
2 cups cooked cubed butternut squash
4 oz goat cheese
1/3 cup shredded parmesan
1/2-2/3 bottle of lager
1/2 tsp freshly ground pepper
Fresh basil (optional)

Directions:

  1. Place a large pot of water on to boil
  2. Heat a skillet over medium-high heat.  Add diced bacon and cook until bacon is crisp.  Remove all but 1 tbsp of the bacon grease
  3. Add pasta to boiling water and cook per directions on pkg
  4. Lower heat to medium low and add onions and garlic.  Sautee until onions are tender, about 5-6 minutes
  5. Return heat to med-high heat, add squash, goat cheese and parmesan and stir well.  Add lager and cook for 3-4 minutes or until sauce thickens.  
  6. When pasta is al dente, spoon pasta directly from pasta water to butternut squash pan (do not rinse pasta as this helps the sauce stick to the pasta) Mix to combine and serve immediately with fresh basil if desired

Friday, September 7, 2012

Green Chile Hummus


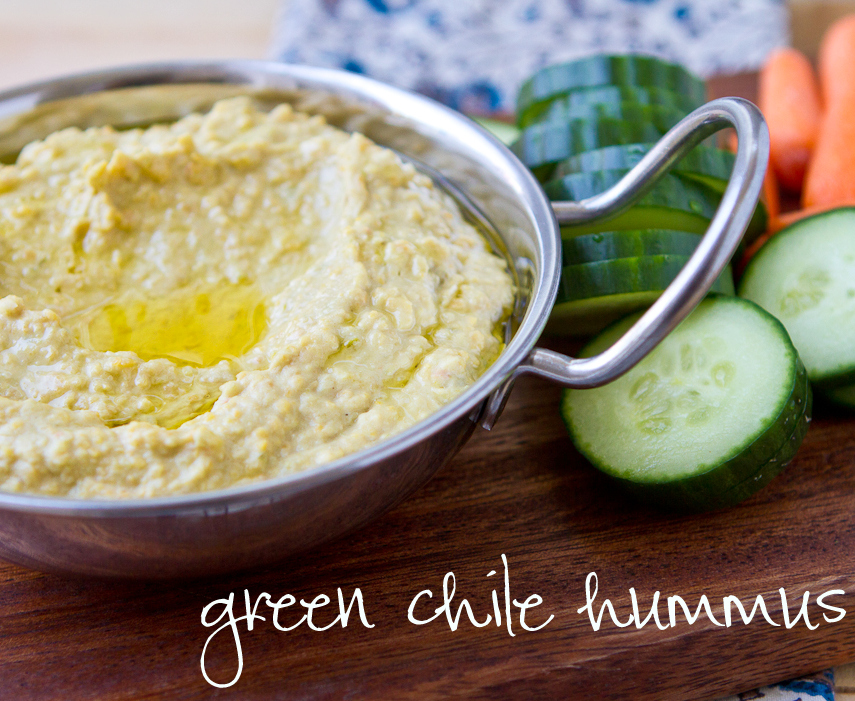
How exactly do you begin sorting through hundreds of vacation photos?  I think procrastination has it's place sometimes...so instead of looking those photos full on in the face, I got back into my humble little kitchen after a week away.  Green chiles are still my great love affair of the moment.  Paired with hummus, it's a perfect blend of smooth lemony hummus and a bit of green chile kick. 


Does hummus really need a recipe?  You just throw one 15 ounce can of drained garbanzos into a food processor along with juice of one lemon, 1/4 cup olive oil, one heaping spoonful of tahini(some say this is optional but I think tahini is essential)  and 2 garlic gloves and puree like CRAZY.   To make it green chile hummus I threw in 2 freshly roasted chiles peeled and chopped and 1/2 tsp cumin before pureeing. 

Easy peasy.


I love buying those fancy schmancy sandwiches for lunch that have hummus in them.  Throw them on a sandwich or wrap at home and you'll think you have a pretty schmance sandwich too. 

Hummus is much easier than sorting through vacation photos. 


Green Chile Hummus

1 15oz can garbanzos rinsed and drained
2 garlic cloves, roughly chopped
juice of one lemon
1/4-1/3 cup extra virgin olive oil
2 freshly roasted and peeled green chiles, roughly chopped
1 heaping tbsp tahini
1/2 tsp cumin

Add all ingredients to food processor and blend thoroughly

Thursday, September 15, 2011

Israeli Couscous with Figs and Carmelized Onions


Think a recipe post in photos and captions only isn't possible?  Let me give it a try....okay, do have to say I toasted the couscous first...great flavor...and then cooked it per the directions on the bag(using veggie broth in place of the water).  The amount of figs, goat cheese, salt, pepper, oil and vinaigrette is per your own taste...I used 1 bag of israeli couscous, half a red onion, one full container of the Trader Joes figs (12 -16 oz?) and about 1/4 cup of crumbled goat cheese, 1/4 cup olive oil and 2-3 tbsp balsamic reduction.  Season with salt and pepper.

Okay, so maybe it's not possible to post a recipe with just photo captions.


Saturday, June 4, 2011

Cooking on a Salt Block

Have you seen these salt blocks? I once had dinner at a restaurant where they brought us a 500 degree salt rock and we were able to sear our fresh ahi right at the table.  It was fun and delish and quite fascinating.  I've resisted the temptation of the $70 salt slab, but when I saw that World Market carries them for only $20, I grabbed it without second thought.  Even better is when it's on sale  and then you apply your World Market Explorer coupon.  The only thing better than a $20 salt block is a $10 one. 

This is going to take a bit of experimentation it turns out.  I don't think I got it quite right the first time.  I started out with some flank steak marinated in a soy ginger marinade overnight.


Even after slowly heating the salt over 40 minutes, I don't think it was hot enough. Or I overloaded the slab...the steak was more steaming in it's juices than searing. Not the most successful first try, but we'll just heat it up a bit longer next time.


Friday, February 25, 2011

Brown Butter Crepes


Crepes.  Enough said right?  But I'll say just a bit more.

Crepes are versatile little suckas.  They can be dainty and vegetarian, hearty and meaty and of course sweet and dessert like.  Though my sister swears my brother in law will eat anything, I feel almost a compulsion to ensure that there's something for everyone.  Crepes make this easy.

This version of crepes calls for browning the butter before adding it.  It's amazing how just toasting or browning ingredients adds a level of flavor.    Then you simply add all of the ingredients to the blender, blend and refrigerate for bit-the batter is that simple. And while making the crepes themselves seems scary, I've learned it's all about confidently pouring the batter and swirling.  If you hesitate, you get something like this.  Not so great.


But if you just pour the batter quickly so that you can start moving the pan around, it just works. Pas de problem. They also make those crepe machines that you dip right into batter--we used those in high school french class and they made crepes as easy as toast.  I've really been limiting the "one use" appliances so nonstick pan it is.  It's still not that hard.


Once you have all of the crepes made, you can refrigerate or use immediately and the filling is only limited by your refrigerator contents.  I opted for ham and swiss in a nod to the croque monsieur for the carnivores, ham, swiss and mushrooms for the omnivores and mushroom and swiss for, well, me. Dinner in 20 minutes is about as easy as it gets.


Brown Butter Crepes

Crepe Ingredients
3 tablespoons butter
2 large eggs
3/4 cup milk
1/2 cup water
1 cup flour
Butter, for coating the pan
Filling Ingredients
deli ham sliced paper thin
shredded baby swiss
mushrooms

Directions
  • In a small saucepan, heat butter over medium high heat until the butter is brown but not burnt--about 2-4 minutes depending upon pan used. 
  • In a blender, combine all of the ingredients and pulse for 10 seconds. Place the crepe batter in the refrigerator for 1 hour. This allows the bubbles to subside so the crepes will be less likely to tear during cooking. The batter will keep for up to 48 hours.
  • Heat a small non-stick pan. Add butter to coat. Pour 1 ounce of batter into the center of the pan and swirl to spread evenly. Cook for 30 seconds and flip. Cook for another 10 seconds and remove to the cutting board. Lay them out flat so they can cool. Continue until all batter is gone.
For filling
  • Preheat oven to 300
  • Sautee vegetable/s with garlic until tender
  • shred cheese
  • Lay crepe out flat, fill half of crepe with fillings of choice
  • Fold crepe in half and then half again and place in large casserole dish and make remaining crepes
  • Cover casserole with aluminum foil and bake for 15-20 mins or long enough to melt cheese.


Monday, January 24, 2011

Spinach and Artichoke Turkey Roulade


I wondered if it was a little too soon after the holidays to cook another turkey dish.  Then I recalled that the last turkey I actually ate was before Thanksgiving and threw caution to the wind. Who's to say that turkey is a holiday only dish anyway?
I'd envisioned a turkey roulade months ago when I stocked an extra turkey breast away in the freezer.  The great thing is that they are small enough to cook without hours of roasting, yet large enough to stuff and roll up. 


The turkey roulade cooks for about an hour or a little more, depending upon the size.  This just happens to be the perfect amount of time to make roasted potatoes if you cube them to about one inch in size. Throw them in the pan along with the turkey, and it's a different kind of "one pot" meal.  I threw asparagus right on top of the potatoes about 10 minutes before everything was done.


Spinach and Artichoke Turkey Roulade

Ingredients

  • 1 boneless turkey breast half with skin on, about 3-4 pounds
  • 3 tablespoons extra-virgin olive oil
  • 1/3 cup ricotta
  • 1 tablespoon minced garlic
  • 10 oz box frozen spinach, thawed
  • 1/2 cup cooked brown rice
  • 1 can artichoke hearts, chopped
  • 1 teaspoons salt
  • 1/2 tsp ground black pepper
  • dash of hot sauce (optional)
  • 1 cup shredded cheese (I used 1/2 cup parmesan, 1/2 cup jack and cheddar)

Directions

  1. Preheat the oven to 400 degrees F.
  2. In a large bowl combine ricotta, rice, artichokes, garlic, cheeses and salt and pepper. Squeeze spinach and add to bowl along with hot sauce if desired.  Mix thoroughly and set filling aside.
  3. On a large cutting board, place turkey breast on top of plastic wrap and make a butterfly cut. Cover with additional plastic wrap and pound to an even thickness of 1/2-inch. Remove plastic wrap and season lightly with salt and pepper.
  4.  Spread filling evenly over turkey breast.
  5.  Carefully roll up the roulade. Using butcher's twine, tie the roulade at even intervals so that it remains tightly rolled. Rub the outside of the roasting pan. 
  6. Roast until golden brown and an instant-read thermometer inserted into the thickest part of the very center of the roulade registers 160 degrees F, about 60-70 mins. Set aside to rest for 15 minutes then slice into 1/2-inch slices and serve hot.

Friday, December 17, 2010

Cookbook #70, Nigella Kitchen


When I lived in NY, I had some friends from Jamaica.  A couple of times a year, we'd head down to Brooklyn Tabernacle to hear the choir and then back to their place for the most amazing homecooked Jamaican meal ever...patties and jerk and rice, oh my.   One of Andrea's staple dishes was "rice and peas" a fabulous, savory coconut rice with beans.  Andrea always explained why they were called "peas" and not beans, but truthfully, I was too busy shoving my face with her cooking, that I don't recall the reason.

When I received Nigella's latest cookbook Nigella Kitchen, I began my standard processs of flipping through the book and adding sticky notes everywhere.  This was definitely a one whole pack of sticky notes kind of book...Irish Oaten rolls (with Guinness), Guinness Gingerbread (do you see Nigella's genius?), Coconut Cherry Banana Bread,  Chocolate Orange Loaf Cake, Papardelle with Butternut and Blue Cheese...it's all good. I had big plans for the Red Velvet Cupcake recipe, that is until I saw the Jamaican Jerk  and Rice and peas recipe.

The ingredient list is long and may be a deterrent initially, but after reading through, I saw that these were spices I already had and it was really just prep the night before.  Cooking the chicken and rice on the second day was easy peasy. 


Most of the rice and peas ingredients came straight from the can--the total effort was chopping onions, and then dumping everything in a pot and letting it cook for 15-20 minutes.


The verdict?  I'm a little torn on this one.  I think the chicken broth in the rice detracted from the coconut flavor of the rice.  If I made it again, I'd either halve or elimate the broth.  I also think both the rice and the chicken had a bit too much thyme and not enough heat.  I think Nigella went a bit meek on this--shouldn't traditional jerk have Scotch Bonnets?  Other than that, it was pretty tasty.  It's definitely not Andrea's, but I've never found Jamaican as phenomenal as hers. 

And the rest of the cookbook?  I'm hoping to find out sooner than later.  I have a couple other recipes tagged for this week, and the Red Velvet Cupcakes planned for Christmas Eve.


Homestyle Jerk Chicken with Rice and Peas
From Nigella Kitchen

Ingredients

  • 6 chicken breasts
  • 2 tsp ground allspice
  • 2 tsp dried thyme
  • 2 tsp cayenne pepper 
  • 2 tsp ground ginger
  • 2 tsp ground nutmeg
  • 2 tsp ground cinnamon
  • 2 garlic cloves, peeled
  • 2 in piece fresh ginger, peeled and cut into chunks
  • 2 tbsp dark muscovado sugar
  • 1/4 cup dark rum
  • 1/4 cup fresh lime juice 
  • 1/4 cup soy sauce
  • 1/2 cup cider vinegar
  • 2 whole fresh red chilies
  • 1 onion, peeled and quartered

Directions

  1. Slash the chicken breasts, 3 slashes per breast, making each slash cut about 1in deep into the meat on the diagonal. Put the chicken breasts into an oblong dish, slashed-sides down.
  2. Put all the other ingredients into a food processor and blitz to a dark, earthy paste, then pour and spread over the chicken pieces and leave to marinate, out of the fridge, for 2-4 hours, or in the fridge, covered, overnight.
  3. Preheat the oven to 400F. Double-line a shallow roasting tin with aluminium foil. Tip into it the chicken, with its marinade, placing the chicken breasts slashed-side up. Roast for 30 minutes.
  4. Take the tin out of the oven and pour off any excess watery juices. Use a pastry brush and a spoon to place any paste that has fallen off the chicken back onto the chicken, then return it to the oven and cook for a further 30 minutes, by which time it will be cooked through and tender with a thick, fiery crust. Serve with rice and peas.

Rice and Peas Ingredients

  • 1 can kidney beans or black-eyed peas
  • 1 tbsp vegetable oil 
  • 1 onion, peeled and finely chopped
  • 1 red chili, de-seeded and finely chopped
  • 2 garlic cloves, peeled and finely chopped
  • 2 cups long-grain rice 
  • 1 14fl oz can coconut milk
  • 1 can chicken or vegetable stock
  • 1 tsp chopped fresh thyme leaves
  • salt, to taste

Directions

  1. Drain and rinse the beans/peas, and heat the oil in a heavy-based pan that has a lid.
  2. Fry the onion for 4-5 minutes, stirring every now and again, letting it soften and brown a little as it fries. Add the chopped chilli and garlic, and give everything a good stir around.
  3. Stir in the rice, making sure it is all slicked with oil, then pour in the coconut milk and chicken or vegetable stock, and stir in the drained gungo peas.
  4. Bring the mixture to a bubble, clamp on the lid, turn down the heat to its lowest setting and let the rice cook gently for 15 minutes.
  5. Check the rice is cooked through and the liquid is all absorbed – give the rice another 5 minutes if need be. Sprinkle with the freshly chopped thyme, and season with salt if desired, forking it through. Serve with jerk chicken.